
Ollama Remote Access: How to Access Ollama From Another Computer
Set OLLAMA_HOST to reach Ollama from another computer, fix the 403 tunnels return, handle CORS and Docker, and expose it without leaving it open.
Ollama’s default behavior is to talk to itself: it binds to 127.0.0.1:11434, the loopback address,
so no other device can access it, not even those on your network. This binding needs to be changed
if you want to use Ollama from a different computer, and how you change it depends on where that
other computer is. It may be another device on your Wi-Fi, or a machine somewhere else entirely, and
that difference matters.
This guide covers the full setup, including the configuration details that cause the most confusion: environment variables, CORS, Docker, and the consequences of putting Ollama on the internet without careful consideration. Exposing Ollama to the internet can have serious consequences. If you would rather not open a port, LocalXpose is a safe alternative tunneling solution, and the remote access section below covers it.
Ollama Network Access: Reaching It From Another Device on Your LAN
Ollama’s network access is managed by the environment variable OLLAMA_HOST. By setting
OLLAMA_HOST to 0.0.0.0:11434, Ollama will listen on all network interfaces, not just the
loopback interface, which means it can be accessed by other devices on the network. The way to set
this variable is different depending on the OS.
Install Ollama on your operating system and execute the commands for your OS.
macOS:
launchctl setenv OLLAMA_HOST "0.0.0.0:11434"Close and open the Ollama app for it to work, and remember that this is not persistent on a reboot; see the section below for persistence.
Linux (systemd):
sudo systemctl edit ollama.serviceThis will open an editor. Add the two lines below; on newer systemd versions the file contains comment markers, and your edits must go in the region above the comment warning that anything below it will be discarded:
[Service]
Environment="OLLAMA_HOST=0.0.0.0:11434"
Save, reload and restart:
sudo systemctl daemon-reload
sudo systemctl restart ollama
Windows:
To get started, quit Ollama from the system tray. Next, go to the Settings menu and search
environment variables, then select Edit environment variables for your account, and create a new
environment variable to store the value 0.0.0.0:11434 under the name OLLAMA_HOST. Then, reopen
Ollama from the Start Menu.
Next, use ipconfig (on Windows), ip addr (on Linux) or ifconfig (on macOS) to locate the local
IP address of the machine. Now test it from another device that is on the same network:
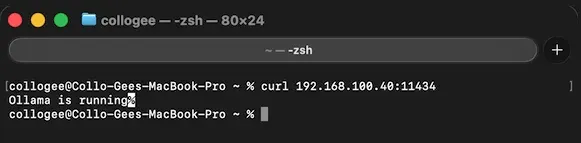
curl http://192.168.100.40:11434If you receive the message Ollama is running, it works.
Times out? Look at your firewall, specifically inbound connections on port 11434, which is likely
where the connection is being denied. Windows will normally prompt the first time; to open it on
Linux, use the following command: sudo ufw allow 11434/tcp.
One variable, two jobs
The variable OLLAMA_HOST serves two purposes, and it is this dual nature that fools people. It
sets the bind address on the server machine, while on a client machine, the same variable specifies
where the ollama CLI should connect.
If you want ollama list and ollama run to communicate with the remote server rather than a local
one, you will need to set it on your second computer as well:
export OLLAMA_HOST=http://192.168.100.40:11434
ollama list
Without it, the CLI on the client keeps looking at its own 127.0.0.1:11434 and reports that
nothing is running.
Accessing Ollama Remotely: Outside Your Network
LAN access is limited to your own Wi-Fi, so if you go somewhere else, such as a coffee shop or another country, reaching Ollama takes one more step. The usual options are forwarding a port on your router, using a VPN, or setting up a tunnel.
The one to be wary of is port forwarding: it exposes a port directly on your public IP address, and Ollama has no authentication of its own, so anybody who discovers the port has full access. This is discussed in greater detail in the security section below.
A VPN into your home or office network is safer, as it makes Ollama appear to be on your LAN from the connecting device’s perspective. It does take some work to set up, either on a router or on a dedicated VPN server.
A tunnel sits in the middle: the router is not opened to the outside world, nor is any VPN
infrastructure required, only a public URL that redirects to the local Ollama instance. Ollama’s
official documentation covers this approach, and it comes with one requirement that catches almost
everyone out: the Host header has to be rewritten on the way in, and that is not optional. The
exact flag or setting that does the rewriting differs from one tunneling tool to the next, so check
the documentation for whichever tool you use.
Why tunnels return 403
Ollama looks at the Host header for incoming requests, and most tunnels forward their own public
hostname, which Ollama does not recognize, so the request returns 403 Forbidden while the
identical request to localhost succeeds. There are open issues on Ollama’s GitHub reporting this
against a number of tunneling tools.
The logic behind the Host check uses the same allow-list as CORS, which means there are two solutions:
- Rewrite the Host header to what Ollama expects. This is Ollama’s documented approach, and the LocalXpose example in the next section shows it in practice.
- Add the tunnel’s public hostname to
OLLAMA_ORIGINSso that Ollama will accept it as sent. For example,OLLAMA_ORIGINS=https://yourname.loclx.io. Set it the same way you setOLLAMA_HOSTon your OS, then restart Ollama.
The header rewrite is the more reliable of the two and is the path Ollama’s own documentation
describes. The OLLAMA_ORIGINS route is worth trying if your tunnel gives you a stable hostname,
since it requires no header manipulation and no reverse proxy.
LocalXpose Header Rewrite
LocalXpose supports the same kind of header rewrite.
First, install LocalXpose with whichever method matches your platform:
# macOS (Homebrew)
brew install --cask localxpose

# Linux (Snap)
sudo snap install localxpose

# Windows (Chocolatey)
choco install localxpose

# Any platform with Node.js
npm install -g loclx
Sign up at localxpose.io, copy your access token from the dashboard, then sign in from the terminal:
loclx account login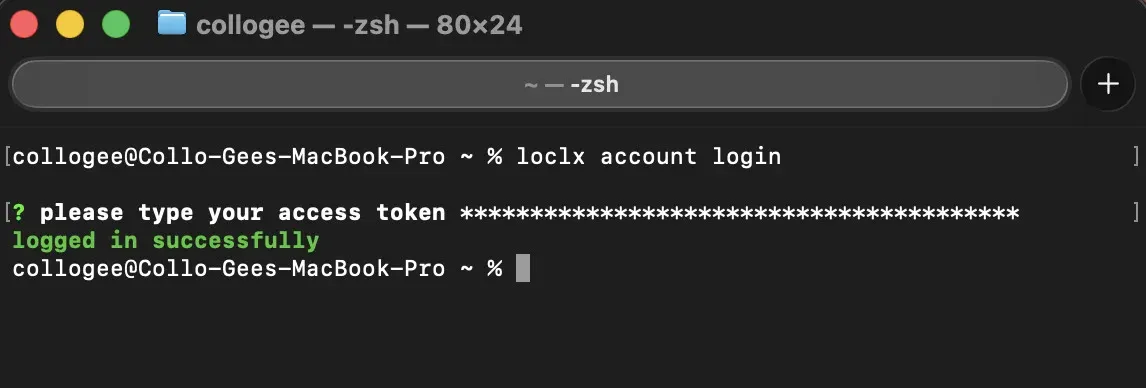
Now run the header rewrite:
loclx tunnel http --to localhost:11434 --request-header host:localhost:11434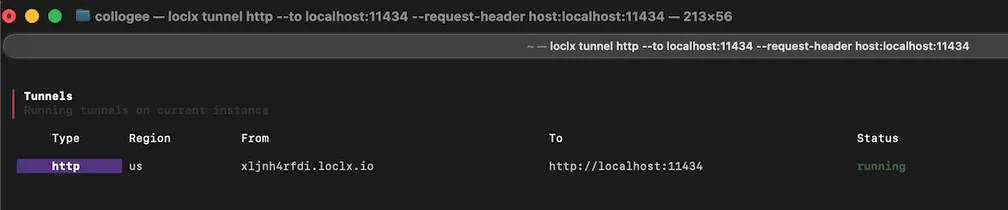
There are also two other alternatives. The first is the OLLAMA_ORIGINS approach outlined above,
which avoids rewriting headers altogether, and the second is Ollama’s documented pattern: place a
reverse proxy in front of Ollama to set the Host header, and tunnel the proxy instead of Ollama.
An example with nginx:
server {
    listen 8080;
    location / {
        proxy_pass http://127.0.0.1:11434;
        proxy_set_header Host localhost:11434;
    }
}
Then tunnel port 8080, not 11434:
loclx tunnel http --to localhost:8080Nginx sets the Host header before the request reaches Ollama.
Ollama Remote Access Setup: Step by Step
From a clean install, the full sequence is:
- Set
OLLAMA_HOST=0.0.0.0:11434as described above for your OS. - Restart the Ollama service or app so the new binding takes effect.
- Make sure that your firewall is open for inbound traffic on port 11434.
- Test on another device on your LAN with
curl http://YOUR-LAN-IP:11434. - Determine if LAN access is sufficient, or if access from outside the network is needed as well.
- If you want access from outside, create a tunnel and handle the Host header as described above, rather than simply forwarding the port on your router.
- Add authentication to whatever sits in front of Ollama, since Ollama has none of its own.
- Test the public URL from a device outside your home network. A phone on mobile data is ideal for this.
Ollama Remote Access Configuration
Depending on your setup, some configuration details outside of the simple OLLAMA_HOST
configuration are important.
-
CORS for browser-based clients. If you’re calling Ollama from a web app in a browser, not from curl or a backend script, then you’re going to need
OLLAMA_ORIGINS. Ollama’s documentation states that cross-origin requests from127.0.0.1and0.0.0.0are allowed by default. In practicelocalhostis covered too, and anything else is blocked. Set it the same way you setOLLAMA_HOST, for exampleOLLAMA_ORIGINS=https://myapp.example.com. Browser extensions use their own schemes, and these have to be permitted explicitly:OLLAMA_ORIGINS=chrome-extension://*,moz-extension://*,safari-web-extension://*This is the same variable that governs the Host header check described above, which is why it doubles as a fix for tunnel 403s.
-
Docker. The official
ollama/ollamaimage listens on all interfaces (0.0.0.0:11434) by default, so the standard run command from Ollama’s documentation is reachable through the published port with no additional environment variable:docker run -d -v ollama:/root/.ollama -p 11434:11434 --name ollama ollama/ollamaExplicitly passing
-e OLLAMA_HOST=0.0.0.0:11434does no harm, but with the official image it changes nothing. It matters only when you build your own image on a different base and install the Ollama binary yourself, because a plain install inside a container binds to127.0.0.1, and the host’s port mapping cannot reach that even though the port looks open from outside.It is worth highlighting that the official image listening on all interfaces is deliberate, which is why the security section below is relevant to container users.
-
The persistence gotcha on macOS.
launchctl setenvonly lasts for the current login session: reboot, andOLLAMA_HOSTreverts to127.0.0.1without any warning. This is not a rare bug, but rather expected behaviour. To make it stick, use a LaunchAgent rather thanlaunchctl setenvalone:<?xml version="1.0" encoding="UTF-8"?> <!DOCTYPE plist PUBLIC "-//Apple//DTD PLIST 1.0//EN" "http://www.apple.com/DTDs/PropertyList-1.0.dtd"> <plist version="1.0"> <dict> <key>Label</key> <string>setenv.OLLAMA_HOST</string> <key>ProgramArguments</key> <array> <string>/bin/launchctl</string> <string>setenv</string> <string>OLLAMA_HOST</string> <string>0.0.0.0:11434</string> </array> <key>RunAtLoad</key> <true/> </dict> </plist>Save it as
~/Library/LaunchAgents/setenv.OLLAMA_HOST.plistand it will run automatically every time you log in.There is one caveat: the Ollama app also registers as a login item, and there is no guarantee the LaunchAgent runs before the app starts. Once you are logged in, check that the variable took by running
launchctl getenv OLLAMA_HOST, and restart Ollama if the app launched first. -
Linux without systemd. If you export the variable in your shell profile, only processes started from that shell are affected, and it may never reach the running Ollama process. Instead, set the variable where Ollama itself is started, either in your init system’s service config or inline when launching it:
OLLAMA_HOST=0.0.0.0:11434 ollama serve.
The Risk of Unmanaged Public Access to Ollama
Before pointing 0.0.0.0 at a machine with a public IP, consider this: Ollama has no login, no API
keys, and no built-in authentication, and anyone who can reach the port can use it as if they were
sitting at your keyboard.
This is not hypothetical.
In September 2025, Cisco Talos ran a Shodan-based scan for Ollama endpoints and found 1,139 exposed endpoints, with over 1,000 of them discovered within the first 10 minutes of scanning. Of these, 214, or about one in five, responded to model queries without requiring any credentials. Other studies have come up with counts in the tens of thousands, but the figures vary widely depending on how a given study is conducted, so any single headline number should be taken with a pinch of salt. The bottom line is that no matter which count you believe, there are a lot of unauthenticated Ollama instances on the public internet.
The mild version is someone using your GPU for free. Wiz Research discovered a path traversal
vulnerability in Ollama’s /api/pull endpoint, dubbed Probllama and tracked as CVE-2024-37032,
which could be escalated to remote code execution on unpatched versions. Wiz noted the problem was
particularly severe on Docker installations, where the server listens on 0.0.0.0 and runs as root.
The 0.0.0.0 bind is still the default in the official image today. Ollama 0.1.34 patched the path
traversal itself; it did not change how the container binds or which user it runs as. So keep your
version current, and treat the container’s networking default as a design choice you must take into
account.
If you have a box with a public IP, do not simply switch to OLLAMA_HOST=0.0.0.0; that is not
sufficient on its own. You need something in front of Ollama:
- A firewall rule scoped to specific source IPs.
- A reverse proxy with its own authentication layer.
- A tunnel, so that you do not need to open any inbound port at all. Add authentication to the tunnel, as shown below.
A Tunnel is Better than an Open Port
There are two differences between a forwarded port and a tunnel: what is exposed, and for how long.
A forwarded port stays open for as long as you leave it open, and it is visible to the same kind of internet-wide scans mentioned above. A LocalXpose tunnel exists only while the process is running: there is no router rule to leave behind and forget, and killing the process ends access immediately.
That is a smaller exposure window, not authentication. A live tunnel is still a public HTTPS URL pointing at a service with no login screen, so if what sits behind it matters, add authentication on the tunnel itself. LocalXpose supports both as plugins:
loclx tunnel http --to localhost:11434 --key-auth secureTokenloclx tunnel http --to localhost:11434 --basic-auth user:passKey auth fits better for an API like Ollama’s: clients pass the token in an X-TOKEN header, and
anything without it receives Access Denied. Basic auth suits a browser-facing UI better, since API
clients would need to be configured to send credentials. Combine either with the Host header
handling described earlier.
Frequently Asked Questions
How do I access Ollama from another computer?
On the Ollama server, set the environment variable OLLAMA_HOST to 0.0.0.0:11434 then restart
Ollama, which will suffice for a device on the same network. A tunnel, VPN or reverse proxy will
also be required if the device is outside your network.
Do I need to set OLLAMA_HOST on the client machine too?
Only if you want to use the ollama CLI there. The same variable that sets the bind address on the
server tells the CLI where to connect on a client, for example
OLLAMA_HOST=http://192.168.100.40:11434. Applications that take an Ollama URL in their own
settings do not need it.
Why do I get connection refused when accessing Ollama remotely?
In most cases because OLLAMA_HOST is still set to 127.0.0.1, so something is answering and
saying no. A request that hangs and then times out is a different problem, typically traffic being
blocked by a firewall or the network having no route to the host at all. A phone on mobile data
cannot reach a bare LAN IP, for instance, and that will time out rather than be refused.
Why does Ollama return a 403 error through a tunnel but work fine on localhost?
Ollama checks the Host header, and most tunnels forward their own public hostname rather than the
address Ollama expects, so Ollama rejects it. Rewrite the Host header on the way in, either through
your tunnel tool or a reverse proxy, or set OLLAMA_ORIGINS to include the tunnel’s hostname.
Do I need to pass OLLAMA_HOST when running the official Docker image?
No. The official ollama/ollama image listens on 0.0.0.0:11434 by default. You only need to set
it yourself if you have built a custom image that installs Ollama on a different base.
Is it safe to set OLLAMA_HOST=0.0.0.0 on a server with a public IP?
Not by itself. Ollama has no built-in authentication, meaning anyone who can reach it has full access, so use it in combination with a firewall rule, a reverse proxy that adds authentication, or an authenticated tunnel, rather than leaving it open to the wider internet.
Does changing OLLAMA_HOST affect performance?
No. It only changes which network interfaces Ollama accepts connections on, and it has no effect on inference speed or resource usage.
Conclusion
Getting Ollama reachable from another computer is simple: it is a one-line environment variable
change. But the location of that other computer matters. On the same network, you need
OLLAMA_HOST=0.0.0.0:11434 and a firewall rule, and that is it. Outside that network, things get
more involved: the Host header check catches people off guard, and the fix is either a header
rewrite or an OLLAMA_ORIGINS entry. And because Ollama is always on with no login of its own, the
access method you choose, and whether you put authentication in front of it, is the part that
actually matters.
