How to Port Forward a Minecraft Server - Step-by-Step Guide
Complete guide on how to port forward a Minecraft server in 2026. For Windows, Linux, macOS, troubleshooting issues, and a better alternative with LocalXpose.

Hosting your own Minecraft server gives you complete control over your gaming world - custom mods, plugins, and rules without the limitations or costs of services like Minecraft Realms. Whether you’re building epic structures with friends or running a community hub, making your server accessible online is key. Learning how to port forward a Minecraft server is the traditional first step, but modern challenges have made this more complicated than it used to be.
In 2026, traditional Minecraft port forwarding faces growing challenges, such as Carrier-Grade NAT (CGNAT) used by many ISPs, which shares public IPs among users and blocks direct inbound connections. This can make port forwarding unreliable or impossible without paying for a static IP upgrade from your ISP.
In this guide, we’ll cover the traditional port forwarding approach step-by-step for Windows, Linux, and macOS, focusing on Minecraft Java Edition, the most common for self-hosting, using version 1.21.11. We’ll also explore a superior alternative: tunneling with LocalXpose, which bypasses these issues entirely, offering secure, easy exposure without router tweaks or exposing your home IP. This method is ideal for home users behind CGNAT or with strict firewalls.
Note: This guide assumes you’re using Minecraft Java Edition on the latest version (1.21.11 as of 2026). For Bedrock Edition, principles are similar but use UDP ports 19132-19133 (see the Bedrock section below). Always prioritize security: Use whitelists, strong authentication, and keep software updated to avoid exploits.
How to Port Forward a Minecraft Server: Quick Overview
Port forwarding redirects incoming internet traffic from a specific port (default 25565 for Minecraft Java Edition) to your local server’s IP address. This allows players outside your home network to connect to your Minecraft server. The process involves configuring your router to forward external requests on port 25565 to your computer running the server, plus adjusting your firewall to allow this traffic.
However, if your ISP uses CGNAT (check if your router’s WAN IP is private, like 100.64.x.x), traditional port forwarding won’t work. In that case, skip to the LocalXpose section for a reliable alternative that works without any router configuration.
Minecraft Server Setup Basics
Before exposing your server, set it up locally. This ensures everything works on your network first.
-
Download the Server Software:
Head to the official Minecraft download page and download the latest Java Edition Server JAR file (minecraft_server.1.21.11.jar). Save it in a dedicated folder, likeC:\MinecraftServeron Windows or~/minecraft-serveron Linux/macOS.
-
Configure the Server:
In your server folder, run the JAR once withjava -Xmx1024M -Xms1024M -jar minecraft_server.1.21.11.jar noguito generate files.This command allocates 1GB of RAM to your server and runs it without a graphical interface.
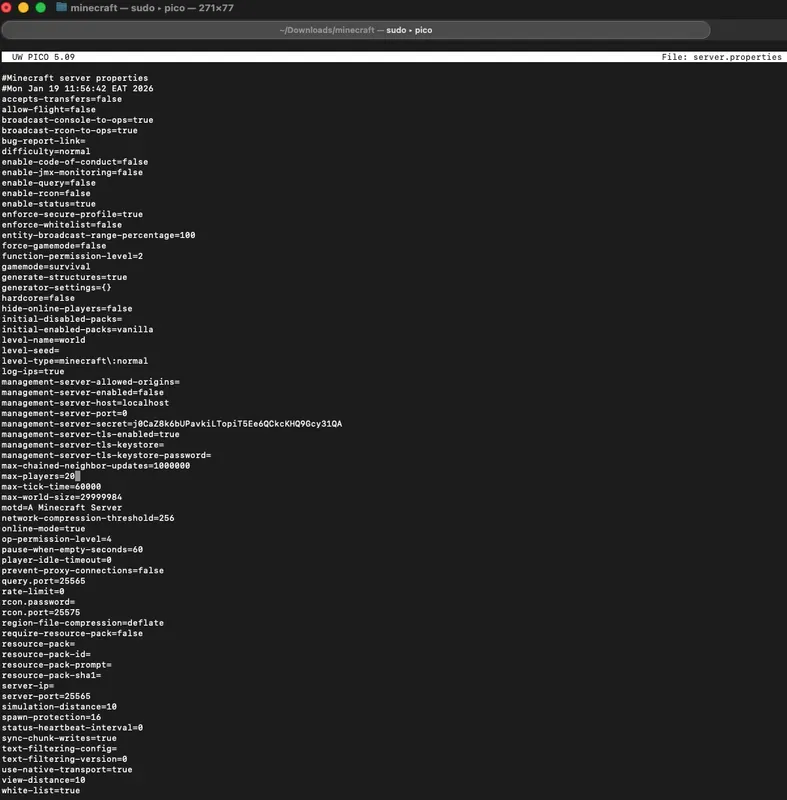
Then, open
server.propertiesin a text editor (like Notepad on Windows or nano on Linux). Key settings:difficulty=normal(adjust as desired)max-players=20(set based on your hardware)online-mode=true(enforces legitimate accounts for security)server-port=25565(default port; change if needed)white-list=true(restrict access to approved players via whitelist.json)
Save changes.
-
Run the Server Locally:
Re-run the commandjava -Xmx1024M -Xms1024M -jar minecraft_server.1.21.11.jar nogui(allocate RAM as needed). The server will bind to your local IP on port 25565.Test by launching Minecraft, going to Multiplayer > Direct Connection, and entering
localhost:25565on the Server Address box.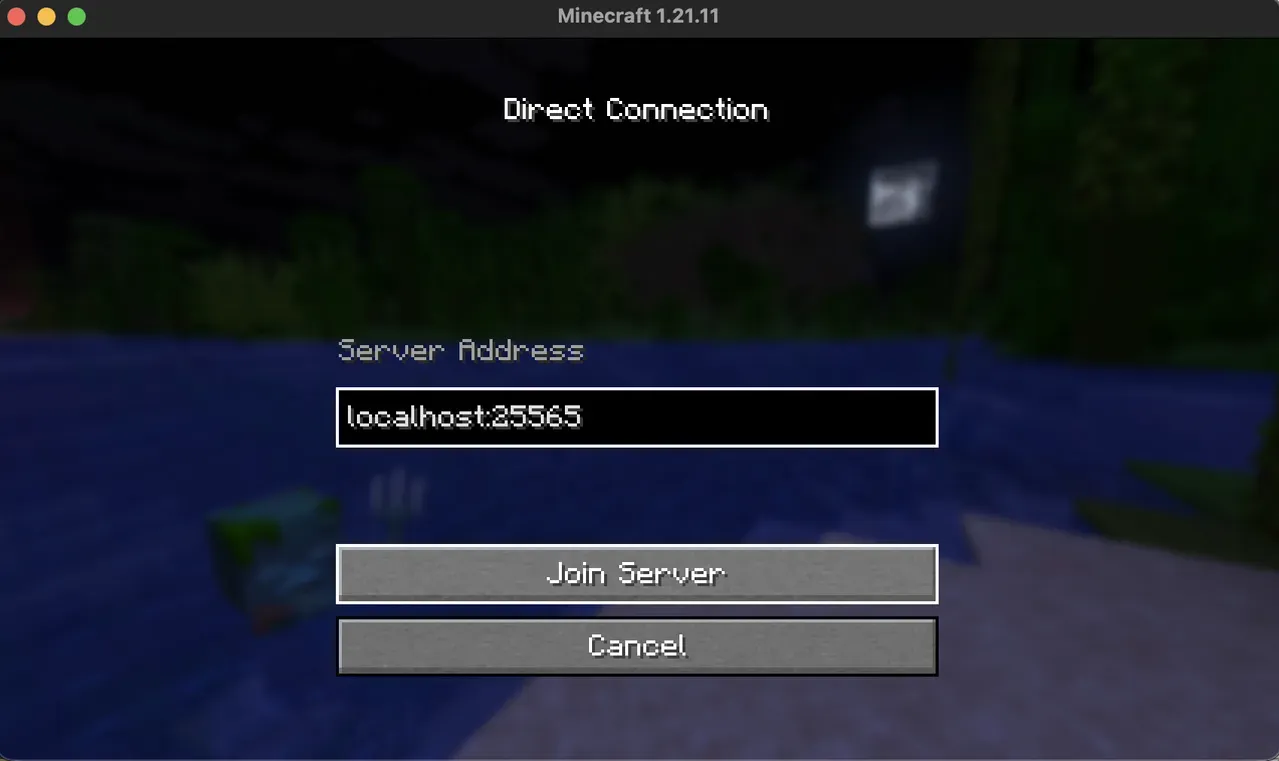
Tip: Run the server as a background service for reliability (e.g., via Task Scheduler on Windows or systemd on Linux).
Minecraft Port Forwarding: TCP or UDP?
Minecraft Java Edition uses TCP on port 25565. This is what you’ll configure in your router’s port forwarding settings.
Minecraft Bedrock Edition uses UDP on ports 19132-19133. If you’re hosting a Bedrock server, you’ll need to forward UDP traffic on these ports instead.
When setting up port forwarding rules in your router, always select the correct protocol (TCP for Java, UDP for Bedrock). Some routers let you select “Both” or “TCP/UDP” - this works but is less secure than only opening the specific protocol you need.
For this guide, we focus on Java Edition (TCP/25565), but the same principles apply to Bedrock - just change the port numbers and protocol in your router settings.
Traditional Method: Port Forwarding Your Minecraft Server
Port forwarding redirects external traffic to your local server. It requires access to your router and firewall. However, if your ISP uses CGNAT (check if your router’s WAN IP is private, like 100.64.x.x), this won’t work, so skip to the LocalXpose section.
General Prerequisites
-
Find your local IP: This is your computer’s address on the home network.
-
Windows: Open Command Prompt, type
ipconfig, and note the IPv4 Address under your active adapter (e.g., 192.168.1.100).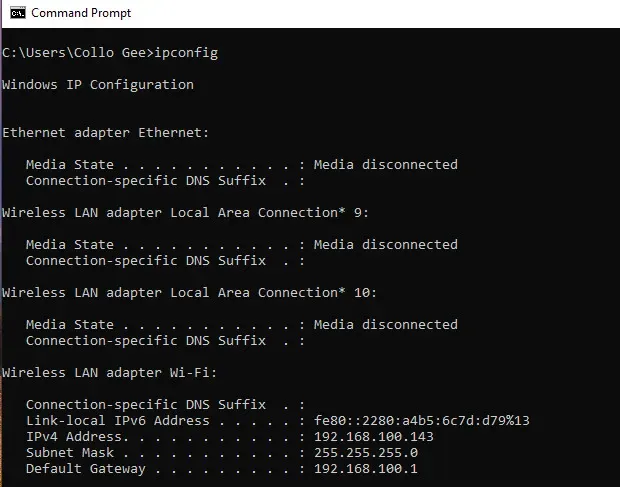
This command displays your network configuration including your local IP address.
-
Linux: In terminal, type
ip addr showand find the inet address under your interface (e.g., enp2s0: 192.168.1.100).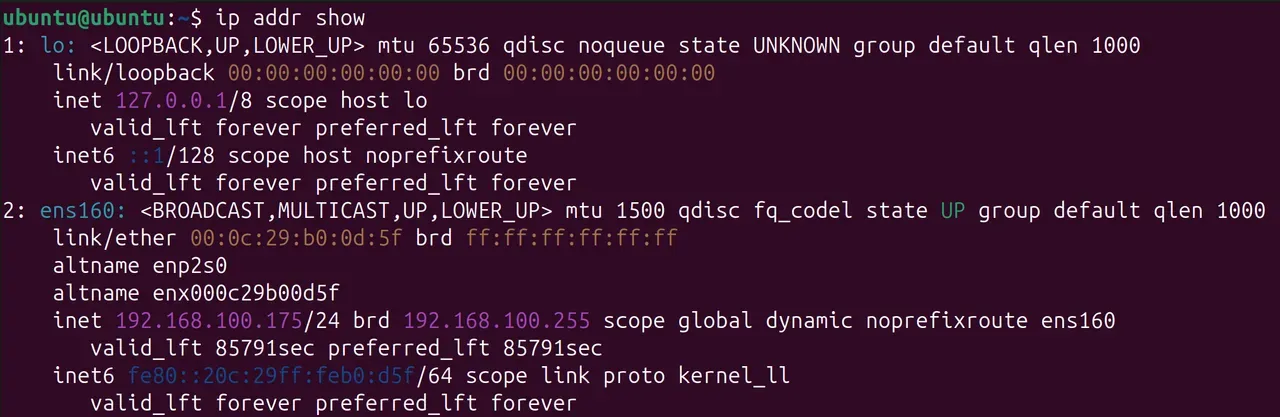
This shows your network interfaces and their assigned IP addresses.
-
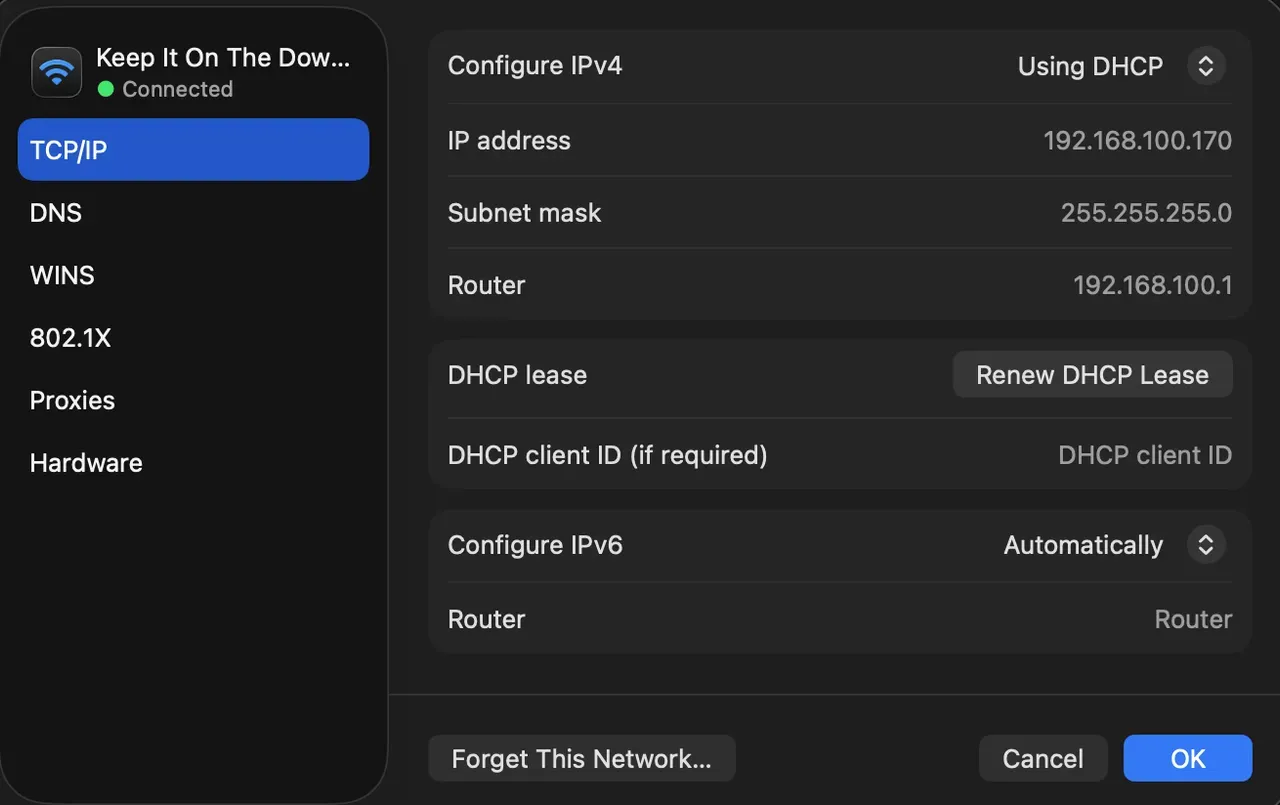
macOS: Go to System Settings > Network > [Your Connection] > Details, and note the IP Address.
-
-
Find your public IP: Visit whatismyipaddress.com to see your external IP address.
-
Set a static local IP: In your router’s DHCP settings, reserve your local IP to prevent changes.
-
Allow through host firewall (detailed below).
Platform-Specific Steps
Windows
-
Firewall Configuration:
Open Windows Defender Firewall > Advanced Settings > Inbound Rules > New Rule.- Select Port > TCP > Specific local ports: 25565 > Allow the connection > All profiles > Name: Minecraft Server.
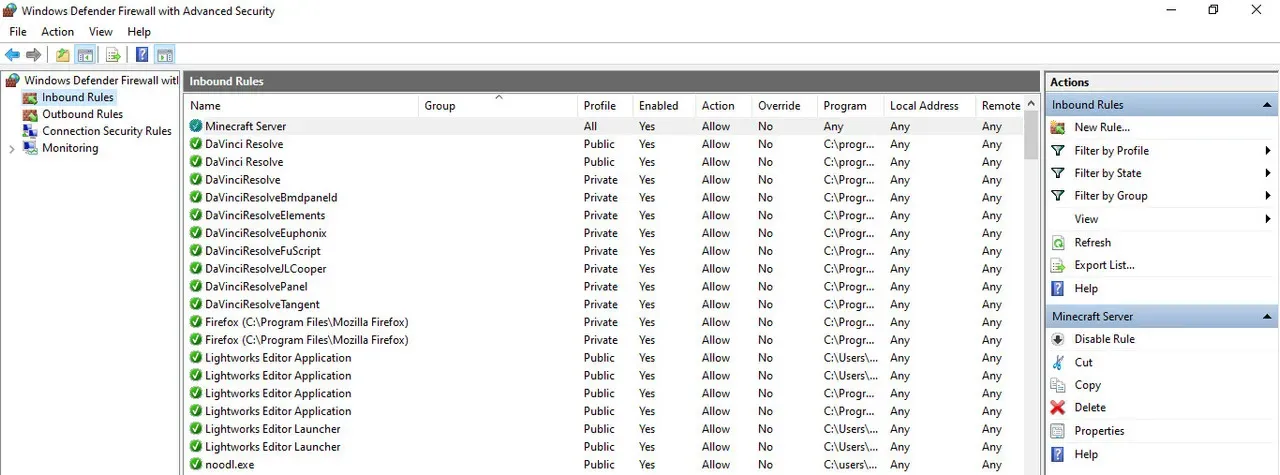
This creates a firewall rule that allows incoming TCP traffic on port 25565.
-
Router Port Forwarding:
Log into your router (usually 192.168.1.1 or 192.168.0.1; default credentials like admin/admin). Go to Port Forwarding/NAT/Virtual Servers.- Add rule: Service: Minecraft, External Port: 25565, Internal Port: 25565, Protocol: TCP, Internal IP: Your local IP.
-
Test:
Restart the server. Use canyouseeme.org to check port 25565 (enter your public IP if prompted). Friends connect viayourpublicIP:25565.
Troubleshooting: If timed out, check double NAT (ISP modem + router), or request public IP from ISP. Use Dynamic DNS (e.g., noip.com) for changing public IPs.
Linux (Ubuntu/Debian Focus)
-
Firewall Configuration:
Install ufw if needed (sudo apt install ufw). Then run:sudo ufw allow 25565/tcp sudo ufw reload
These commands open port 25565 for TCP traffic and reload the firewall rules.
-
Router Port Forwarding:
Same as Windows - access router admin page and add the rule for TCP 25565 to your local IP. -
Test:
As above. For static IP, edit/etc/netplan/or use Network Manager.
Tip: Run server as a systemd service: Create /etc/systemd/system/minecraft.service with your
java command, then sudo systemctl start minecraft.
macOS
-
Firewall Configuration:
macOS firewall is application-based. Go to System Settings > Network > Firewall > Options. Enable it, then add Java.app (or the server process) and allow incoming connections.
-
Router Port Forwarding:
Identical to other platforms. -
Test:
Use canyouseeme.org. For advanced port control, usesudo pfctlcommands in terminal.
Common Issues Across Platforms:
- Port blocked by ISP: Try a different port (e.g., 25566) and update server.properties.
- Security Risks: Open ports can attract attacks; enable whitelist and monitor logs.
- Dynamic Public IP: Set up Dynamic DNS to map a domain like myserver.ddns.net to your IP.
Minecraft Port Forwarding Not Working? Common Fixes
If you’ve followed the steps above but players still can’t connect, try these solutions:
1. CGNAT Detection:
Check if your router’s WAN/Internet IP starts with 100.64.x.x or matches your local IP range. If so,
your ISP uses CGNAT and traditional port forwarding won’t work. Solution: Use LocalXpose (see below)
or contact your ISP for a public IP upgrade (usually costs extra).
2. Double NAT:
If you have both an ISP modem and a separate router, you may have double NAT. Check by comparing
your router’s WAN IP to your public IP (whatismyipaddress.com).
If they differ, you need to:
- Put your ISP modem in bridge mode, OR
- Forward ports on both the modem AND router
3. Firewall Blocking:
Even with port forwarding configured, your computer’s firewall might block connections. Verify:
- Windows: Check Windows Defender Firewall allows Java on both Private and Public networks
- Linux: Run
sudo ufw statusto confirm port 25565 is allowed - macOS: Ensure Java has incoming connection permission in System Settings > Firewall
4. Incorrect Local IP:
Your computer’s IP might have changed if you don’t have a static IP reservation. Verify your current
local IP matches what you configured in port forwarding. Set a DHCP reservation in your router to
prevent this.
5. ISP Port Blocking:
Some ISPs block common ports like 25565 to prevent server hosting. Test by:
- Changing
server-portin server.properties to something like 25566 - Updating your port forwarding rule to match
- Having friends connect to
yourIP:25566
6. Server Not Running:
Obvious but often overlooked - make sure your Minecraft server is actually running and listening on
the correct port before testing external connections.
Still not working? The LocalXpose method below bypasses all these issues entirely.
Minecraft Bedrock Port Forwarding
While this guide focuses on Minecraft Java Edition, hosting a Bedrock server follows similar principles with key differences:
Port and Protocol:
Bedrock uses UDP ports 19132-19133 (instead of TCP 25565). When configuring port forwarding, select
UDP protocol and forward both ports.
Server Software:
Download the
official Bedrock Dedicated Server
(available for Windows and Linux). Configuration is done through server.properties similar to Java
Edition.
Router Configuration:
The port forwarding setup is identical to Java Edition, but change:
- Protocol: UDP
- External Port: 19132-19133
- Internal Port: 19132-19133
Firewall Rules:
Allow UDP traffic on ports 19132-19133 instead of TCP 25565.
LocalXpose Support:
If you’re using LocalXpose (see the “Easier & Safer Alternative” section below), it supports UDP
tunneling for Bedrock servers. Use:
loclx tunnel udp --region us --to 127.0.0.1:19132This creates a public UDP endpoint that Bedrock players can connect to without any port forwarding.
Easier & Safer Alternative: Expose Your Minecraft Server with LocalXpose (No Port Forwarding Needed)
If port forwarding fails due to CGNAT, complexity, or security concerns, use LocalXpose, a tunneling tool that creates a secure bridge from your local server to a public endpoint. It works on all platforms, hides your home IP, and supports low-latency regions.
Why LocalXpose?
| Feature | Port Forwarding | LocalXpose |
|---|---|---|
| Router Changes Needed | Yes | No |
| CGNAT Compatible | No | Yes |
| Home IP Exposed | Yes (risky) | No (uses loclx.io domain) |
| Setup Time | 30-60 min | 5-10 min |
| Security | Open port vulnerabilities | Encrypted tunnels |
| Cost | Free (but potential ISP fees) | Free tier + Pro (~$8/month) |
Benefits include bypassing firewalls, global region selection for minimal ping, and easy setup for “Open to LAN” or dedicated servers. This method is particularly useful for accessing your local network remotely without exposing your home network. LocalXpose’s local tunnel feature supports TCP, UDP, and HTTP protocols for different server types.
Step-by-Step Setup
-
Sign Up:
Create an account at localxpose.io and follow the instructions under Start your first tunnel. -
Install CLI:
Download for your OS (Windows: .exe; Linux: snap/deb/binary; macOS: binary). Install via command or GUI.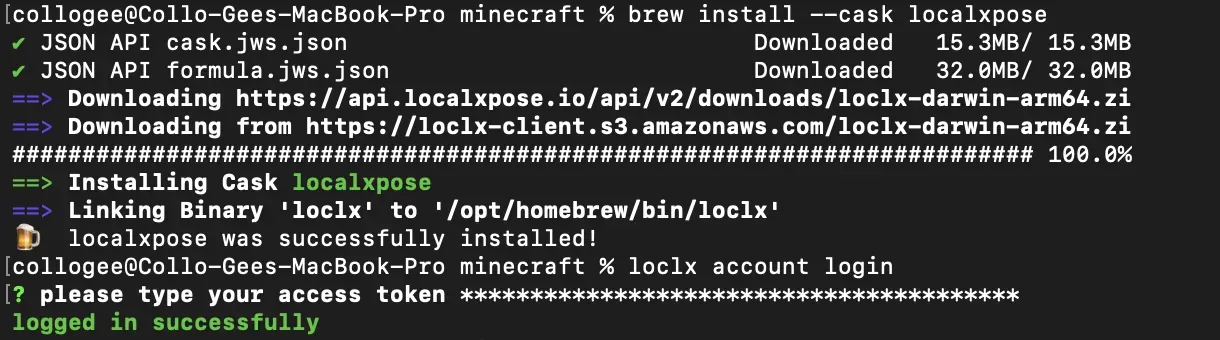
-
Start Your Server:
Run your dedicated Minecraft server on port 25565. -
Create Tunnel:
In terminal/CMD, run:loclx tunnel tcp --region us --to 127.0.0.1:25565This creates a TCP tunnel from a public LocalXpose endpoint to your local Minecraft server on port 25565.
Choose region like
us,eufor best latency; loclx will assign a random available port.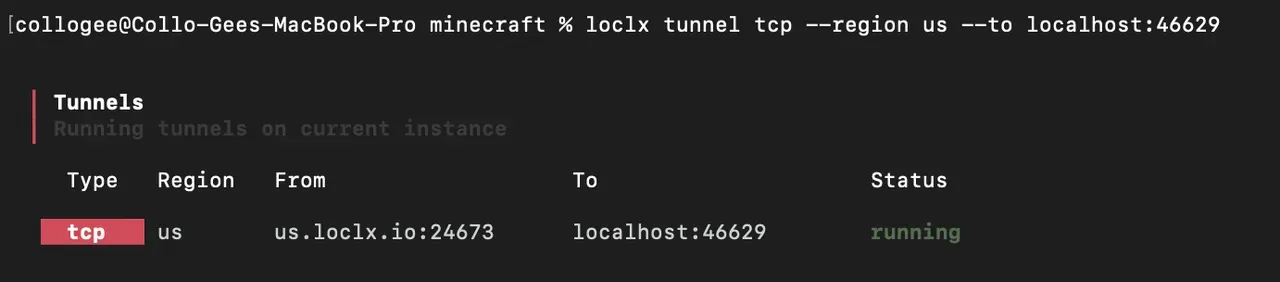
-
Connect:
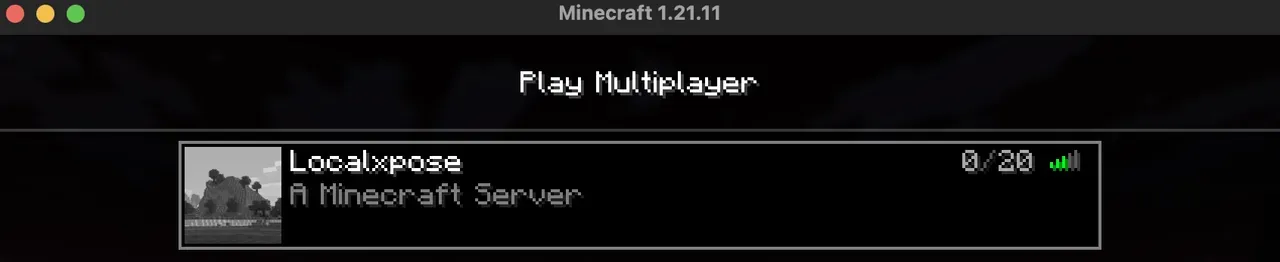
Friends add the public address (e.g.,us.loclx.io:24673) in Minecraft > Multiplayer > Add Server.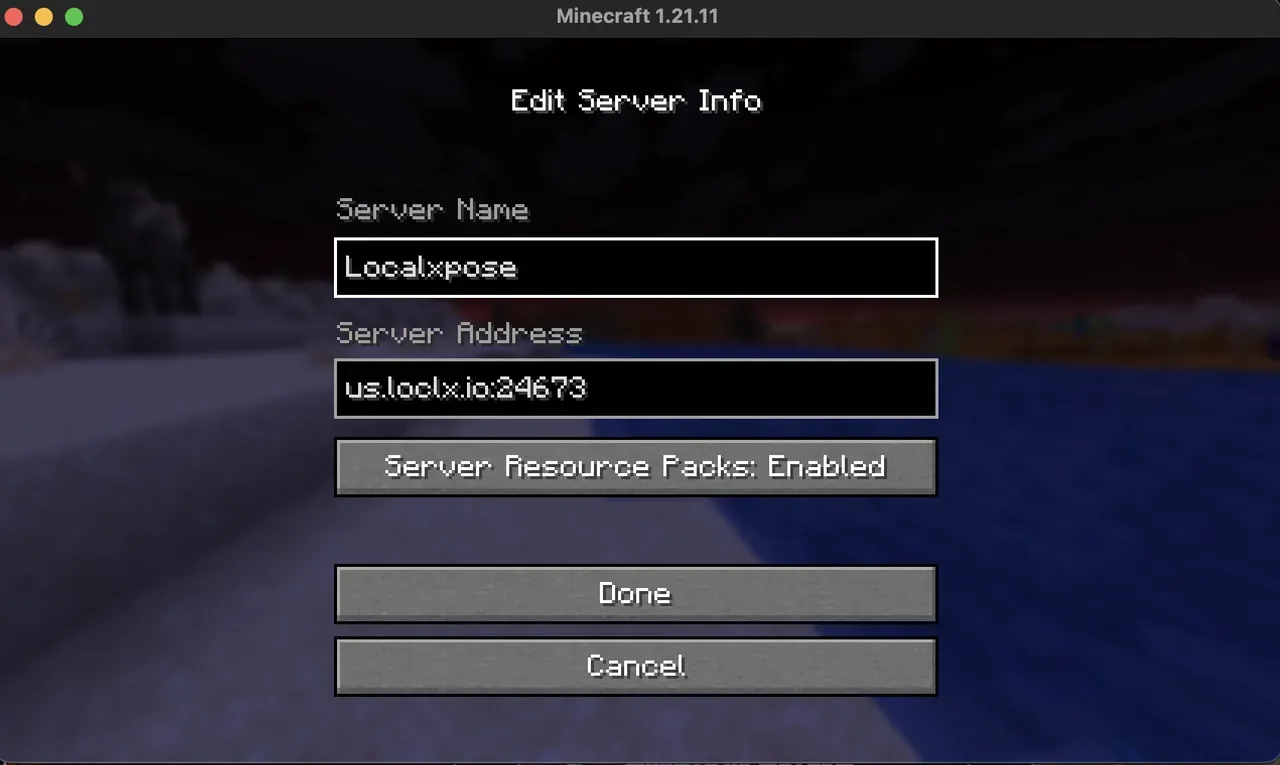
Tips:
- Keep LocalXpose and Minecraft server running (use screen/tmux on Linux)
- LocalXpose Pro version allows reserved ports for consistency
- For mods like Fabric/Forge, ensure compatibility
- Test latency by pinging the loclx.io domain
Conclusion
Port forwarding remains a solid option if your setup allows it, but in 2026, with widespread CGNAT and security threats, it’s often frustrating. LocalXpose provides a modern, reliable alternative - secure, simple, and effective for any network. Start with their free trial, then upgrade to Pro for full features.
Ready to play? Visit LocalXpose’s Minecraft app page or check out the step-by-step tutorial to get online fast.
For more tunneling tutorials and use cases, check out our guides on testing webhooks locally and IoT remote access.
Happy mining!
