How to Test Webhooks Locally - A Developer's Guide
Learn how to test webhooks locally. Step-by-step tutorial for testing GitHub and Slack webhooks with Express, including Docker setup and troubleshooting.
Webhooks are one of those things that look simple on paper: “when X happens, send an HTTP request to my server.” The friction starts the moment you try to test it during development.
Most of the time, your webhook handler lives on something like http://localhost:3000. But Stripe,
GitHub, Slack, or any other provider can’t reach your laptop’s localhost from the public internet.
So you end up in that annoying loop where the provider says “webhook delivery failed,” and your
local app never even sees the request.
A tunnel solves this by giving you a public URL that forwards incoming HTTP(S) traffic to your local server. LocalXpose is built for exactly this: it’s a reverse proxy that exposes localhost services to the public internet, and its HTTP tunnels generate a shareable URL that’s accessible from the internet.
In this article, we’ll use that tunnel to test webhooks locally end-to-end with a minimal Express server, then run through real provider scenarios (GitHub first, then Slack). We’ll also cover LocalXpose setup in a Docker-friendly way, with a non-Docker CLI option for anyone who prefers installing the client directly.
Test Webhooks Locally: Quick Overview
To test webhooks locally, you need a tunneling tool that creates a public URL pointing to your local development server.
This allows webhook providers like GitHub, Stripe, or Slack to send events to
https://your-public-url/webhooks/endpoint, which then forwards to your localhost:3000 webhook
handler. LocalXpose provides this tunneling capability with a simple command, giving you an HTTPS
URL that stays active while you develop and debug webhook integrations without deploying to a
staging server.
The basic workflow is as follows:
Run your webhook receiver locally → start a LocalXpose tunnel → register the public URL with your webhook provider → receive real webhook events on localhost.
Read on for a complete step-by-step tutorial with working code examples for GitHub and Slack webhooks.
What Are Webhooks?
A webhook is a simple idea: when something happens in Service A, it sends an HTTP request to a URL you control. Instead of your app constantly checking (“has anything changed?”), the service pushes the update to you the moment the event occurs.
In practice, a webhook is usually an HTTP POST request sent to a webhook endpoint (a “callback URL” you register in the provider’s dashboard) carrying a JSON payload describing what happened (the event data).
A typical webhook flow looks like this:
- You create a route in your app (e.g.,
POST /webhooks/github). - You register the full URL for that route in the provider (GitHub/Slack/etc).
- When the event happens, the provider sends an HTTP request to that URL with the event payload.
- Your server returns a 2xx response to confirm it received the webhook (many providers treat non-2xx as a failure and may retry).
Two examples you’ll see in real products:
GitHub: Repository webhooks send HTTP POST payloads when events happen (push, pull request opened, release published, etc.).
Slack (Events API): After you configure an app and set a Request URL, Slack sends event payloads to your endpoint when subscribed events happen in your workspace.
One important point: a webhook endpoint is an internet-facing entry point into your system, so
providers typically support signing webhook requests. For example, GitHub can include
X-Hub-Signature-256 when you configure a secret, so your server can verify the payload was
actually sent by GitHub and wasn’t tampered with.
What Is Tunneling (And What Problem Does It Solve)?
When you run an app locally, it usually sits behind two layers that make it effectively “private”: your machine isn’t publicly addressable, and your network is typically behind NAT/firewalls. That’s why a webhook provider can’t just “call your localhost” - there’s no public route into your laptop.
Tunneling is a practical workaround: it creates a secure path between a public endpoint and your local service. You start a tunnel client on your machine, it establishes an outbound connection to a provider’s edge, and the provider gives you a public URL. Requests sent to that public URL are then forwarded through the tunnel to your local server. This is the core idea behind most localhost tunneling tools.
For webhook testing, tunneling solves three things at once:
-
Reachability:
Webhook providers need an internet-accessible URL. A tunnel gives you one and forwards the traffic to your local port, so Stripe/GitHub can deliver events to your development environment. -
HTTPS without extra setup:
Many providers strongly prefer (or require) HTTPS endpoints. Tunneling tools commonly terminate HTTPS at the edge and forward to your local HTTP server, so you can develop locally without managing certificates. (LocalXpose’s HTTP tunnel specifically runs as HTTP(S) and returns a shareable URL.) -
Faster feedback loops:
Instead of deploying to a staging server just to test a webhook, you can iterate locally, watch incoming payloads in real time, tweak your handler, and trigger the event again. That’s a big productivity win in day-to-day development.
It’s also worth saying out loud: tunneling is not only for webhooks. The same mechanism is commonly used for general app testing, previewing an in-progress feature for a teammate, testing an OAuth callback during development, or accessing a local API from a mobile device. In other words, once you understand tunneling for webhooks, you’ve basically learned a reusable technique for any integration that needs to reach something running on your machine. For a broader look at tunneling options, see our guide on Cloudflare tunnel alternatives.
What Is LocalXpose?
LocalXpose is a tunneling service that gives you a public URL and forwards requests from that URL to a service running locally (in our case, an Express server). That’s what makes it perfect for webhook testing: GitHub/Stripe can hit the public URL, and the request still lands on your laptop.
In this article, we’ll run LocalXpose using two methods, with Docker and without it. If you want to peek at the official references, check out:
- LocalXpose Docker setup
- HTTP tunnel concept
- Docker image
How it fits the flow:
Webhook provider → LocalXpose public URL → your local Express route (e.g. /webhooks/github).
Building a Multipurpose Express Webhook Receiver
You can use VS Code or any editor you prefer. If you’re on VS Code, open the project folder and run the commands in the integrated terminal (Terminal → New Terminal). It behaves like a regular terminal, just inside your workspace.
The idea for this server is simple:
- One Express app
- Separate routes for each provider (
/webhooks/slack,/webhooks/github) - Solid logging
- Body parsing set up in a way that won’t block signature verification later (GitHub + Slack both support request signing, so we’ll keep a copy of the raw request body)
1) Create the Project
In your terminal:
mkdir webhook-local-test
cd webhook-local-test
npm init -y

npm i express dotenv
npm i -D nodemon
Update your package.json scripts so you can run npm run dev:
{
  "scripts": {
    "dev": "nodemon index.js",
    "start": "node index.js"
  }
}
This sets up npm run dev to auto-restart your server on file changes during development.
Create a .env file:
touch .envAdd these environment variables:
PORT=3000

# Optional for now (recommended later)
GITHUB_WEBHOOK_SECRET=
SLACK_SIGNING_SECRET=
These environment variables configure your server port and provide placeholders for webhook secrets you’ll add later.
2) Create a Small Structure
Set up the basic directory structure for your webhook routes:
mkdir routes
touch index.js routes/slack.js routes/github.js
This creates your main server file and separate route handlers for GitHub and Slack webhooks.
3) Wire the Main Server
Create index.js:
require('dotenv').config();
const express = require('express');

const githubRoutes = require('./routes/github');
const slackRoutes = require('./routes/slack');

const app = express();
const PORT = process.env.PORT || 3000;

// Health check (useful when we verify the tunnel later)
app.get('/health', (_, res) => res.status(200).json({ ok: true }));

/**
 * GitHub + Slack deliver JSON payloads.
 * We enable JSON parsing AND keep a copy of the raw bytes (req.rawBody)
 * so signature verification later can use the exact payload.
 */
app.use(
  express.json({
    limit: '2mb',
    verify: (req, _res, buf) => {
      req.rawBody = buf; // Buffer
    },
  }),
);

app.use('/webhooks/github', githubRoutes);
app.use('/webhooks/slack', slackRoutes);

// Basic 404 handler (helps when you typo a route)
app.use((req, res) => {
  res.status(404).json({
    error: 'Not found',
    method: req.method,
    path: req.originalUrl,
  });
});

app.listen(PORT, '0.0.0.0', () => {
  console.log(`Webhook receiver running on http://localhost:${PORT}`);
  console.log(`Health check: http://localhost:${PORT}/health`);
});
This Express server sets up webhook routes for GitHub and Slack, preserves raw request bodies for signature verification, and includes a health check endpoint for testing connectivity.
4) Slack Route
Create routes/slack.js:
const express = require('express');
const router = express.Router();

router.post('/', (req, res) => {
  console.log('\n[SLACK] Webhook received');
  console.log('Time:', new Date().toISOString());
  console.log('Outer type:', req.body?.type);
  console.log('Raw body bytes:', req.rawBody?.length ?? 0);

  // Slack URL verification handshake (required when you set the Request URL)
  if (req.body.challenge != null) {
    //When you enable Event Subscriptions in Slack, Slack makes a one-time post call to the app
    //sending a challenge field value and expects the app to respond with this value.
    res.type('txt');
    res.send(req.body.challenge);
  }
});

module.exports = router;
This route handles Slack webhook events and responds to Slack’s URL verification challenge (required when setting up Event Subscriptions).
Quick note: Slack signs the requests it sends. For a first pass, the goal is simply “does the event reach my local server?”—but for anything beyond testing, you should verify Slack signatures using your Signing Secret.
5) GitHub Route
Create routes/github.js:
const express = require('express');
const router = express.Router();

router.post('/', (req, res) => {
  const event = req.headers['x-github-event'];
  const deliveryId = req.headers['x-github-delivery'];
  const signature256 = req.headers['x-hub-signature-256']; // only present if a secret is configured

  console.log('\n[GITHUB] Webhook received');
  console.log('Time:', new Date().toISOString());
  console.log('Event:', event);
  console.log('Delivery ID:', deliveryId);
  console.log('Signature header present:', Boolean(signature256));
  console.log('Raw body bytes:', req.rawBody?.length ?? 0);
  console.log('Top-level keys:', req.body ? Object.keys(req.body) : []);

  // Keep it simple for now: acknowledge quickly
  return res.status(200).json({ ok: true });
});

module.exports = router;
This route logs GitHub webhook details (event type, delivery ID, signature header) and returns a quick 200 response to acknowledge receipt.
Important note (security, but keep it simple): this is enough to test delivery, but it’s not ideal
for real systems. In production, you should set a webhook secret in
GitHub and
verify X-Hub-Signature-256 on every request—otherwise anyone who finds your endpoint can POST fake
events to it.
6) Create Dockerfile for the App
In the root directory of the application, create a new file named Dockerfile:
touch DockerfileAdd this Docker configuration to run the app:
FROM node:20-alpine

WORKDIR /app

# Copy dependency files first for caching
COPY package*.json ./

RUN npm install

# Copy app source
COPY . .

EXPOSE 3000

CMD ["npm", "run", "dev"]
This Dockerfile packages your Express app into a container using Nodejs, copies dependencies and source code, and starts the dev server.
7) Build the Image
Build your Docker image with this command:
docker build -t webhook-receiver .This command builds a Docker image named webhook-receiver from your Dockerfile.
8) Run the Container
Start the application container:
docker run \
  --rm \
  -p 3000:3000 \
  --env-file .env \
  webhook-receiver
This runs your webhook receiver container, mapping port 3000 and loading environment variables from your .env file.
In another terminal, test the health endpoint:
curl http://localhost:3000/healthYou should get:
{ "ok": true }At this point, your webhook receiver is ready. Next, we’ll expose it with LocalXpose (Docker), confirm the public URL reaches your machine, and then start plugging that URL into GitHub and Slack.
Expose Your Local Server with LocalXpose (Docker)
Before you do anything here, make sure Docker is actually running:
-
Start Docker first:
- If you’re on macOS or Windows: open the Docker Desktop app and wait until it says it’s running.
(If Docker Desktop isn’t running,
docker run …will fail because there’s no Docker engine/daemon behind it.) - If you’re on Linux: start the Docker daemon with your system service manager (for example,
sudo systemctl start docker).
Quick check (any OS): run
docker psin a terminal. If it returns a table (even an empty one), you’re good. - If you’re on macOS or Windows: open the Docker Desktop app and wait until it says it’s running.
(If Docker Desktop isn’t running,
-
Keep your Express app running:
In a separate terminal, confirm this still works locally:curl http://localhost:3000/healthYou should see
{"ok":true}. -
Export your LocalXpose access token:
Get your token from your LocalXpose dashboard, then export it:export LX_ACCESS_TOKEN=your-access-token -
Start the tunnel container (Docker):
Now run LocalXpose and point it to your Express server port.macOS / Windows (Docker Desktop):
docker run --rm -it -e LX_ACCESS_TOKEN \
  localxpose/localxpose:latest \
  tunnel http --to host.docker.internal:3000
Linux:
docker run --rm -it --network host -e LX_ACCESS_TOKEN \
  localxpose/localxpose:latest \
  tunnel http --to localhost:3000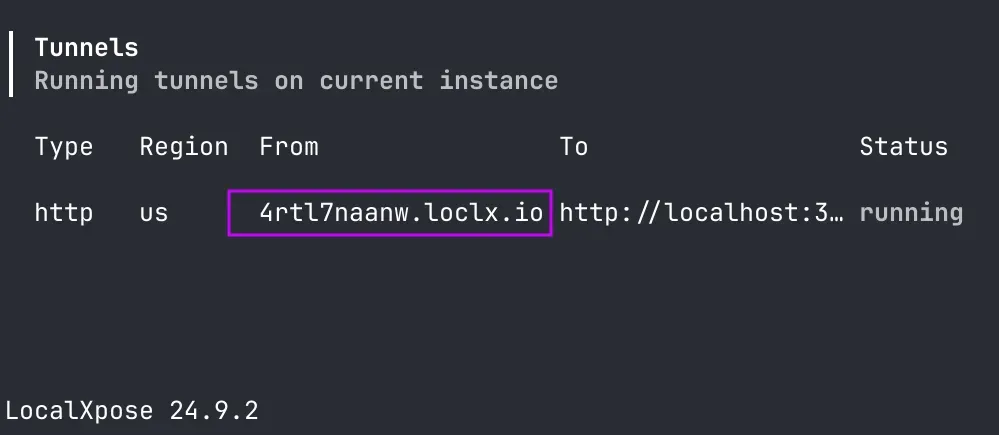
-
Verify the tunnel is working:
When the container starts, it will print a public URL. Test it against your health endpoint:curl https://<your-public-url>/health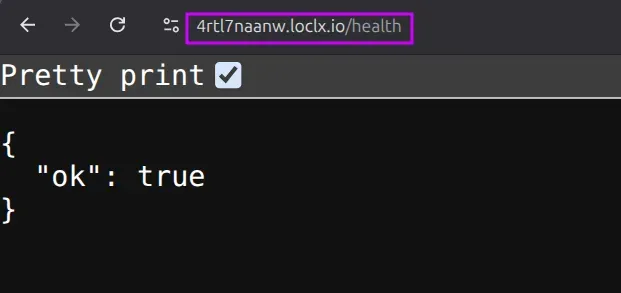
If you get
{"ok":true}, you’ve passed the checkpoint: your local server is now reachable from the internet, so webhook providers can deliver events to it.
Example 1 - GitHub Test Webhook (Push Event)
This is usually the quickest end-to-end win, because GitHub makes it easy to send real events (push/PR) and inspect deliveries in the UI.
-
Assuming you already have a repo for this test, go to your repository → Settings → Webhooks → “Add webhook”.
-
Fill the important fields:
- Payload URL:
Use your LocalXpose public URL plus the GitHub route:https://<your-localxpose-url>/webhooks/github - Content type:
Chooseapplication/json(so Express parses it cleanly). - SSL verification:
Keep it enabled (your LocalXpose URL should already be HTTPS).
- Payload URL:
-
Now you have to choose events. For this guide, keep it simple by selecting “Just the push event”.
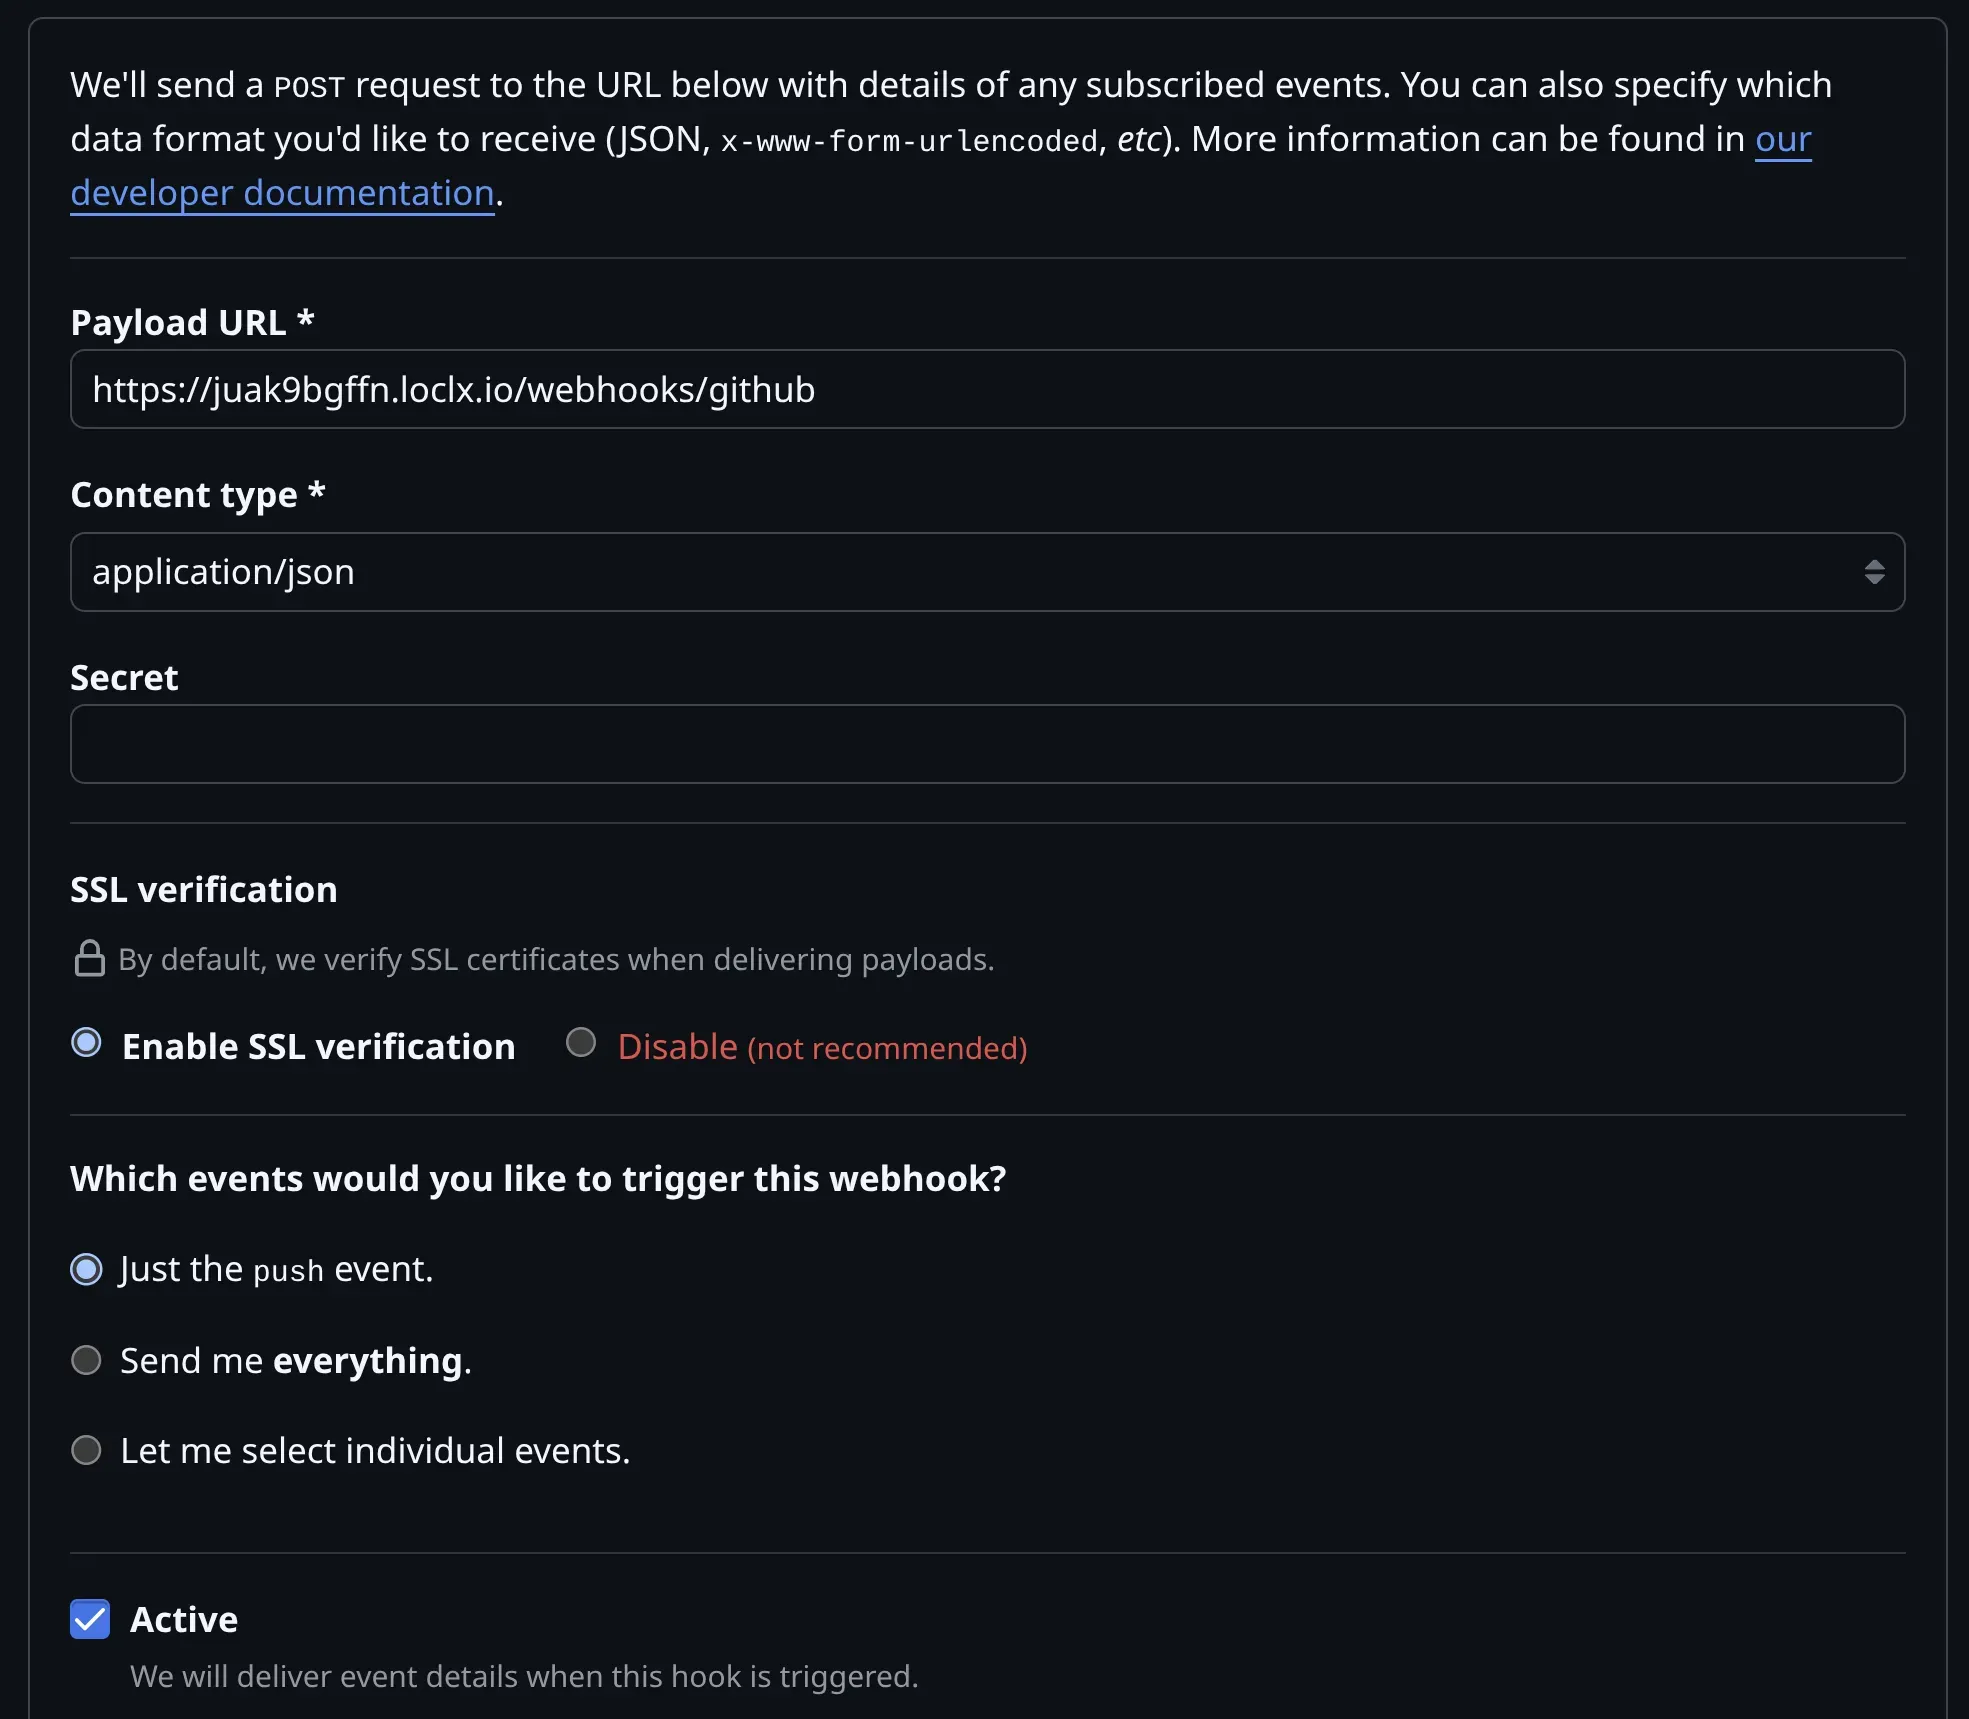
You can always add more event types later when you expand beyond push/PR testing.
-
Trigger a push by making a small commit and pushing to the repo you configured.
-
Your server should print something like:
- Event:
push - Delivery ID: (a unique id)
- Top-level keys in the JSON body
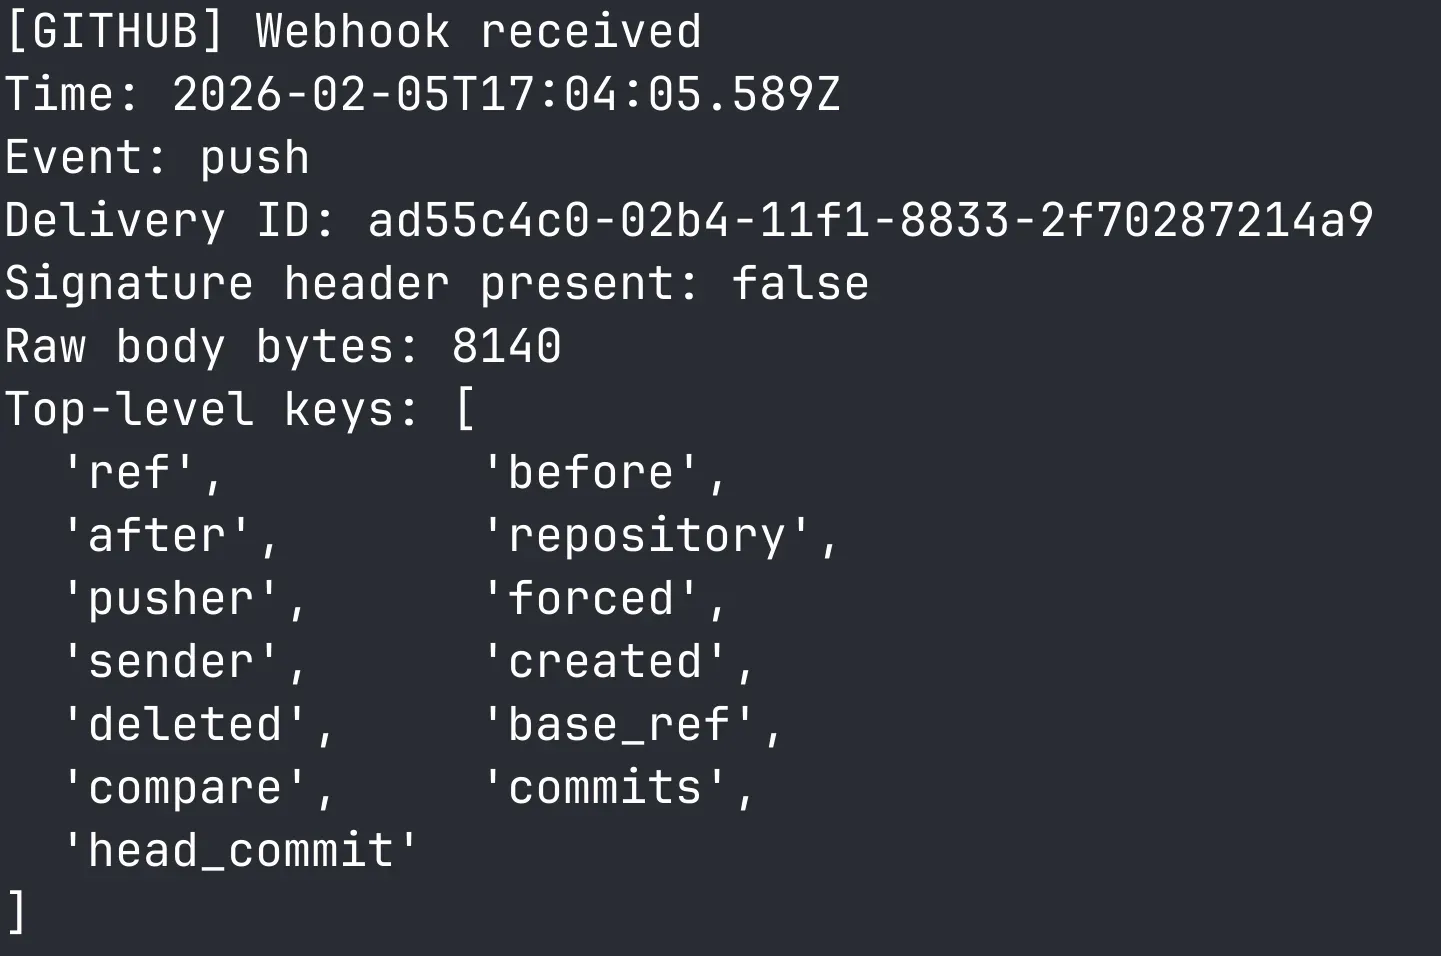
- Event:
-
In the webhook page, GitHub shows “Recent Deliveries”. Open one and you can see:
- Request headers
- Request body
- Response status from your server
This is great for debugging when you’re not sure whether the problem is “GitHub didn’t send” vs “my endpoint didn’t receive”.
You will also be able to see the event logs on the Express server we set up.

Note: If you’re using a free LocalXpose account, you may occasionally see network-related issues under high load. For production workloads, consider a LocalXpose Pro account for reliable connections.
Example 2 - Slack Test Webhook (Quick Webhook Test)
If you want a clean “does my webhook endpoint actually receive real third-party callbacks?” test, Slack’s Events API works well. Slack will send HTTP POST requests to your endpoint whenever subscribed events happen in your workspace.
Quick setup note: Slack Events requires a Slack app. You don’t need to go deep, just create the app and set the Request URL.
-
Create a Slack app.
-
In your app settings, enable Event Subscriptions.
-
Set Request URL to your LocalXpose URL + your Slack route:
When you paste the URL, Slack immediately runs a URL verification handshake (it sends a
url_verificationpayload with achallengeyou must echo back).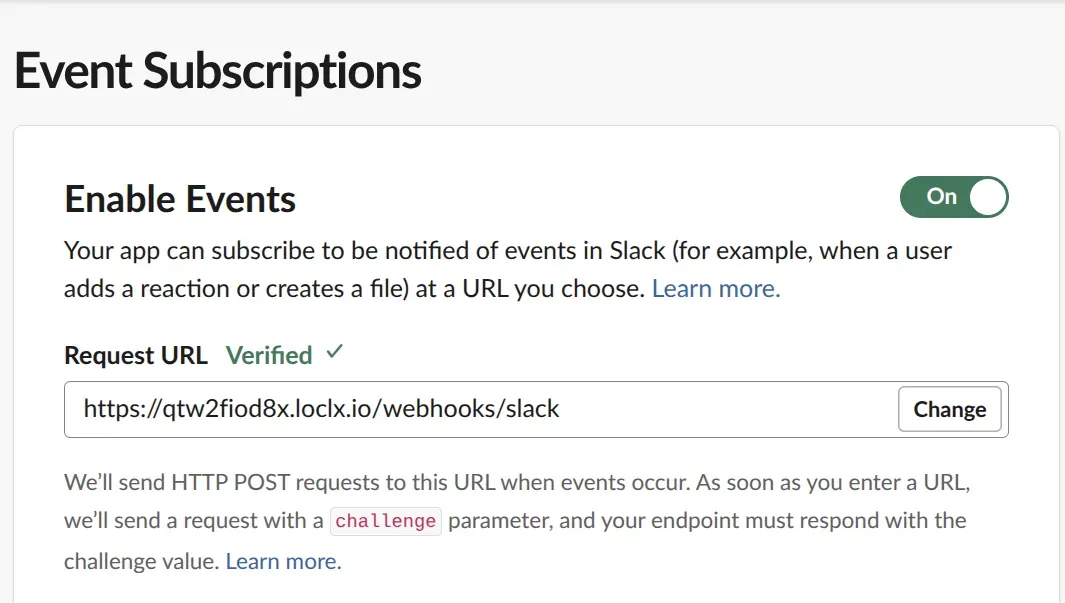
-
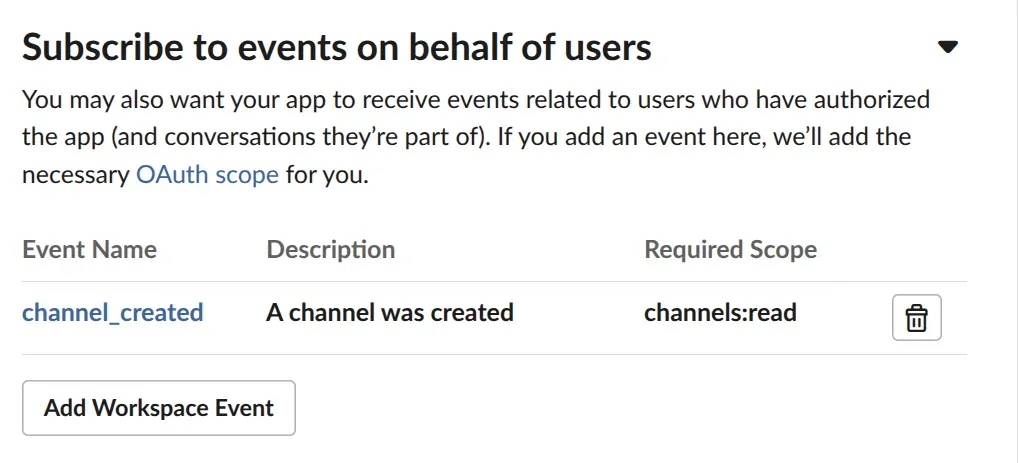
Scroll down and expand “Subscribe to events on behalf of users”, click “Add Workspace Event”, select the event name “channel_created” to keep things simple, then click Save Changes.
-
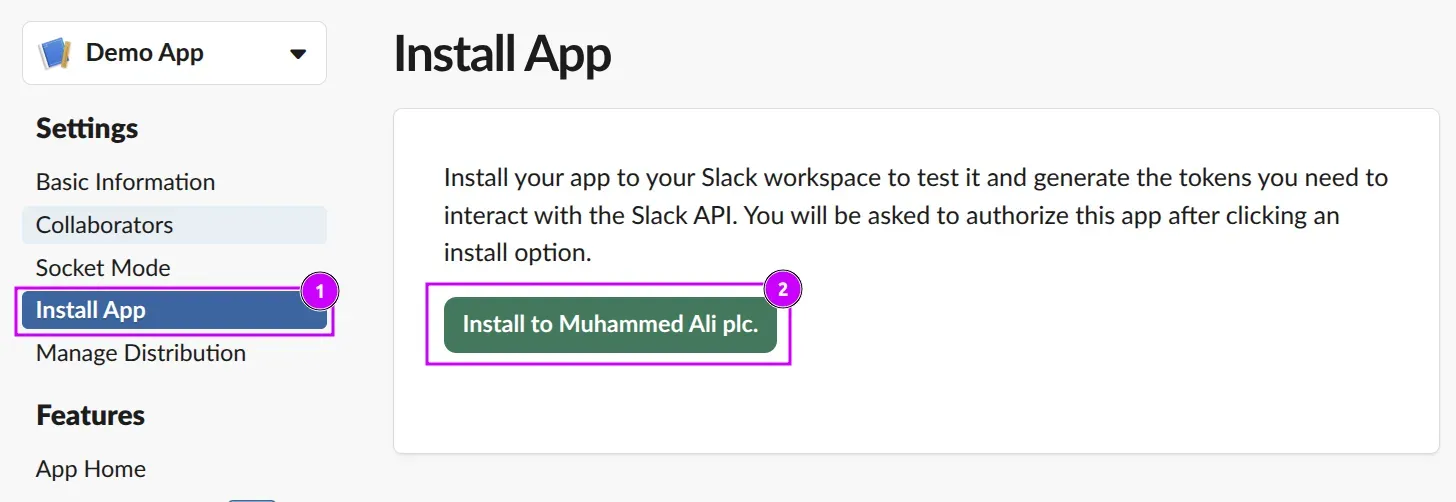
In the left menu, click on the “Install App” option, then click “Install to Workspace name”.
-
Now click “Allow” to allow your application to access your selected workspace.
-
Now create a new channel on your Slack workspace.
-
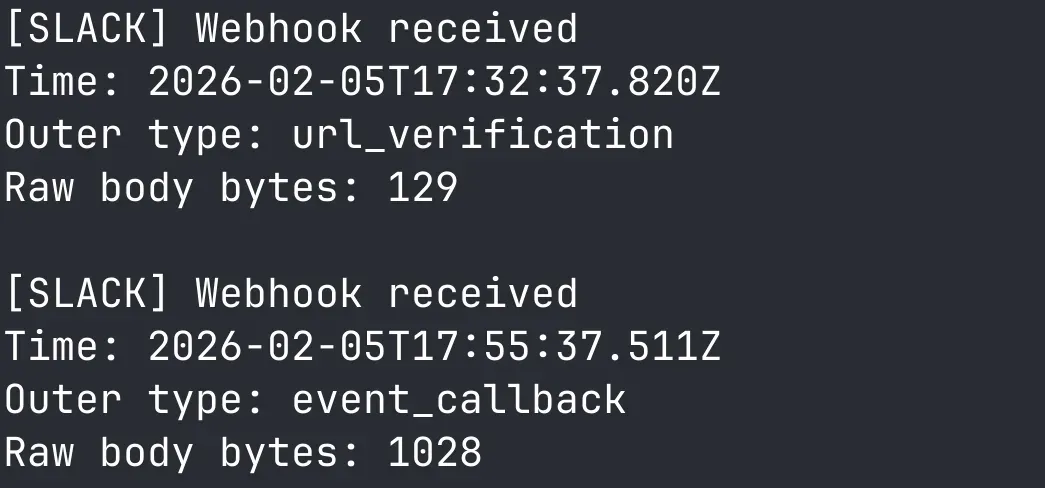
Watch your local logs and you should see the challenge request and the channel creation notification.
Further Exploration (Optional)
If you want to take this beyond “it works on my machine,” here are three quick upgrades that matter in real systems:
-
Acknowledge fast, process later:
GitHub expects a 2xx response within 10 seconds or it treats the delivery as failed. Slack is even stricter and will retry failed/unacknowledged deliveries up to 3 times. In practice: log what you need, return 200/202 quickly, and move heavier work to a background job/queue. -
Expect duplicates and retries:
Even when everything is “correct,” you can still receive the same event more than once (timeouts, retries, manual redelivery during debugging). Slack includes anx-slack-retry-numheader on retries, which is useful for troubleshooting. So aim for idempotent handling (processing the same event twice shouldn’t create double side effects). -
Verify authenticity (recommended):
For this tutorial we skip signature verification to keep the flow simple, but for real deployments you should validate that requests actually came from the provider (GitHub supports signed payloads viaX-Hub-Signature-256when you configure a secret).
Troubleshooting Webhook Testing
If your LocalXpose URL loads in the browser and curl works, but GitHub/Slack deliveries still
fail, the issue is usually related to one of these common problems: incorrect HTTP method or path,
unexpected redirects, slow response times, or the provider hitting a different URL than the one
you’re testing.
-
Test the exact webhook route with a real POST:
A lot of people only confirmGET /healthin the browser, but providers will POST to your webhook routes. So test the exact path and method:# GitHub-style POST (basic) curl -i -X POST "https://<your-localxpose-url>/webhooks/github" \ -H "Content-Type: application/json" \ -H "X-GitHub-Event: push" \ -H "X-GitHub-Delivery: local-test-1" \ -d '{"hello":"github"}' # Slack URL verification POST (required for Request URL setup) curl -i -X POST "https://<your-localxpose-url>/webhooks/slack" \ -H "Content-Type: application/json" \ -d '{"type":"url_verification","challenge":"abc123"}'These commands simulate what GitHub and Slack actually send, helping you verify your routes work before connecting real providers.
If these don’t show up in your logs, GitHub/Slack won’t reach you either.
-
Watch for redirects (301/302):
Your webhook endpoints should return a straight 2xx. If you’re seeing302 Location: /(or any redirect), treat it as a bug for webhook delivery - many providers won’t “follow” it the way a browser does. -
Make sure you respond fast:
GitHub expects a 2xx within 10 seconds - otherwise it terminates the connection and marks the delivery as failed. Slack expects a 2xx within 3 seconds - otherwise it considers the attempt failed and retries. So keep your handlers lightweight: log, quickly acknowledge, and avoid slow work in the request cycle. -
Confirm the provider is calling the same URL you’re testing:
It’s easy to rotate a tunnel URL and keep testing the “new” one in your terminal while GitHub/Slack is still configured with the “old” one. In GitHub, check the delivery details and confirm the exact Payload URL matches what you’re curling. -
LocalXpose network checks:
If things are inconsistent across networks, LocalXpose calls out two common blockers: outbound TCP port 54536 and DNS filtering. We recommend testing the port like this:telnet portquiz.net 54536This tests whether your network allows outbound connections on the port LocalXpose requires.
If that fails, you’ll need to allow outbound TCP 54536 (or test on a hotspot/VPN to confirm it’s network-specific).
Wrap-Up
You’ve now built a small Express webhook receiver, exposed it with LocalXpose, and tested real webhook deliveries using GitHub and Slack Events. At this point, you’ve got everything you need to develop webhook handlers locally with a tight feedback loop.
If you want to take it a step further (optional):
-
Use a stable LocalXpose URL:
If you’re restarting tunnels a lot, reserve a subdomain or custom domain so your webhook URL doesn’t keep changing (this saves you from constantly updating GitHub/Slack settings). -
Add signature verification (recommended):
For the tutorial, we kept things simple so you can see events hit your server. In real deployments, you should verify that requests are actually from GitHub/Slack before processing them (GitHub supportsX-Hub-Signature-256when you set a secret). -
Treat retries/duplicates as normal:
Slack retries failed requests (and tells you viax-slack-retry-num). GitHub doesn’t automatically redeliver failed deliveries, but you can redeliver from the UI while testing or recovering from downtime.
For more LocalXpose tutorials and use cases, check out our guide on exposing n8n to the internet or learn about accessing your local network remotely. For a comparison of tunneling tools, see best ngrok alternatives.
