Expose Self-hosted Local n8n to the Internet for Webhooks
Step-by-step tutorial to expose local n8n to the internet. Configure webhooks, test with external services, and choose between CLI or Docker.
Running n8n locally on http://localhost:5678 works great for building workflows, but external
services like Stripe, GitHub, or Slack can’t reach your
localhost to trigger webhooks. This
tutorial shows you how to expose local n8n to the internet and configure n8n webhook URL settings
using LocalXpose, giving you remote access to your local n8n instance through a public HTTPS URL.
LocalXpose is a localhost tunnel service that creates secure connections from the internet to your local network. It provides instant HTTPS URLs without requiring domain purchases or complex server configuration.
You’ll learn two methods: using the LocalXpose CLI directly, or running LocalXpose as a Docker container. Both approaches let you test webhook integrations without deploying n8n to a production server.
Why Use a Tunnel to Expose n8n to the Internet?
When you install n8n locally, it runs on http://localhost:5678 and is only accessible from your
own machine. This creates a problem when you need external services like Stripe, GitHub, or Slack to
send webhooks to your n8n workflows. These services need a public URL they can reach from anywhere
on the internet.
The traditional solution requires:
- Purchasing a domain name
- Configuring DNS records
- Setting up a reverse proxy (nginx or Caddy)
- Obtaining and managing SSL certificates
- Opening ports on your router and firewall
- Maintaining server security updates
This approach works for production deployments but adds significant complexity and cost when you just want to test webhooks or build workflows locally.
LocalXpose provides a simpler alternative. Think of it as an ngrok alternative but better. It creates a secure tunnel from the internet directly to your local machine, giving you a public HTTPS URL instantly. No domain purchase, no server configuration, no certificate management. You keep n8n running locally while external services can reach it as if it were deployed on a public server.
This makes LocalXpose ideal for:
- Testing webhook integrations during development
- Sharing demo workflows with clients or teammates
- Running n8n from home without complex networking setup
- Prototyping before committing to production infrastructure
What You’ll Need
Before starting, make sure you have:
- n8n running locally on
http://localhost:5678(accessible in your browser) - LocalXpose account with access token (free tier works fine)
- Terminal access on macOS, Linux, or Windows
- Docker installed (only needed for Method 2)
How LocalXpose Works with n8n
The setup is straightforward:
- n8n continues running on
http://localhost:5678(nothing changes here) - LocalXpose creates a secure tunnel from the internet to your local port
- You get a public HTTPS URL (like
https://your-subdomain.loclx.io) - Configure n8n to use this public URL for webhook endpoints
- External services send webhooks to the LocalXpose URL → forwarded to your local n8n
Configure n8n Webhook URL for Remote Access
A critical step when exposing n8n remotely is configuring the webhook URL. By default, n8n generates
webhook URLs using http://localhost:5678, which only works on your local machine. External
services can’t reach localhost addresses.
When you set the WEBHOOK_URL environment variable to your LocalXpose public URL, n8n automatically
generates webhook endpoints that external services can access. For example:
- Before:
http://localhost:5678/webhook/stripe-payment - After:
https://your-subdomain.loclx.io/webhook/stripe-payment
This configuration change is required for both the CLI and Docker methods covered below. Without it, webhook nodes will display localhost URLs that external services cannot reach, breaking integrations with platforms like Stripe, GitHub, and Slack.
Method 1: Expose n8n to the Internet Using LocalXpose CLI
This method uses the LocalXpose command-line tool directly on your machine. It’s the quickest way to get started if you’re not using Docker.
Step 1: Verify n8n is Running
Open your browser and navigate to:
http://localhost:5678You should see the n8n workflow editor. If it doesn’t load, start n8n using your usual method
(Docker, n8n start, or npm) before continuing.
Step 2: Install LocalXpose CLI
Download the LocalXpose CLI from localxpose.io/download for your operating system.
On macOS or Linux, the binary can be manually installed with:
# Make the binary executable
chmod +x loclx

# Move to your PATH
sudo mv loclx /usr/local/bin/
You can also use Snap:
snap install localxposeOr Homebrew:
brew install --cask localxposeOr npm:
npm install -g loclxVerify the installation:
loclx --versionStep 3: Authenticate LocalXpose
Log into your LocalXpose dashboard and copy your access token from the Access section.
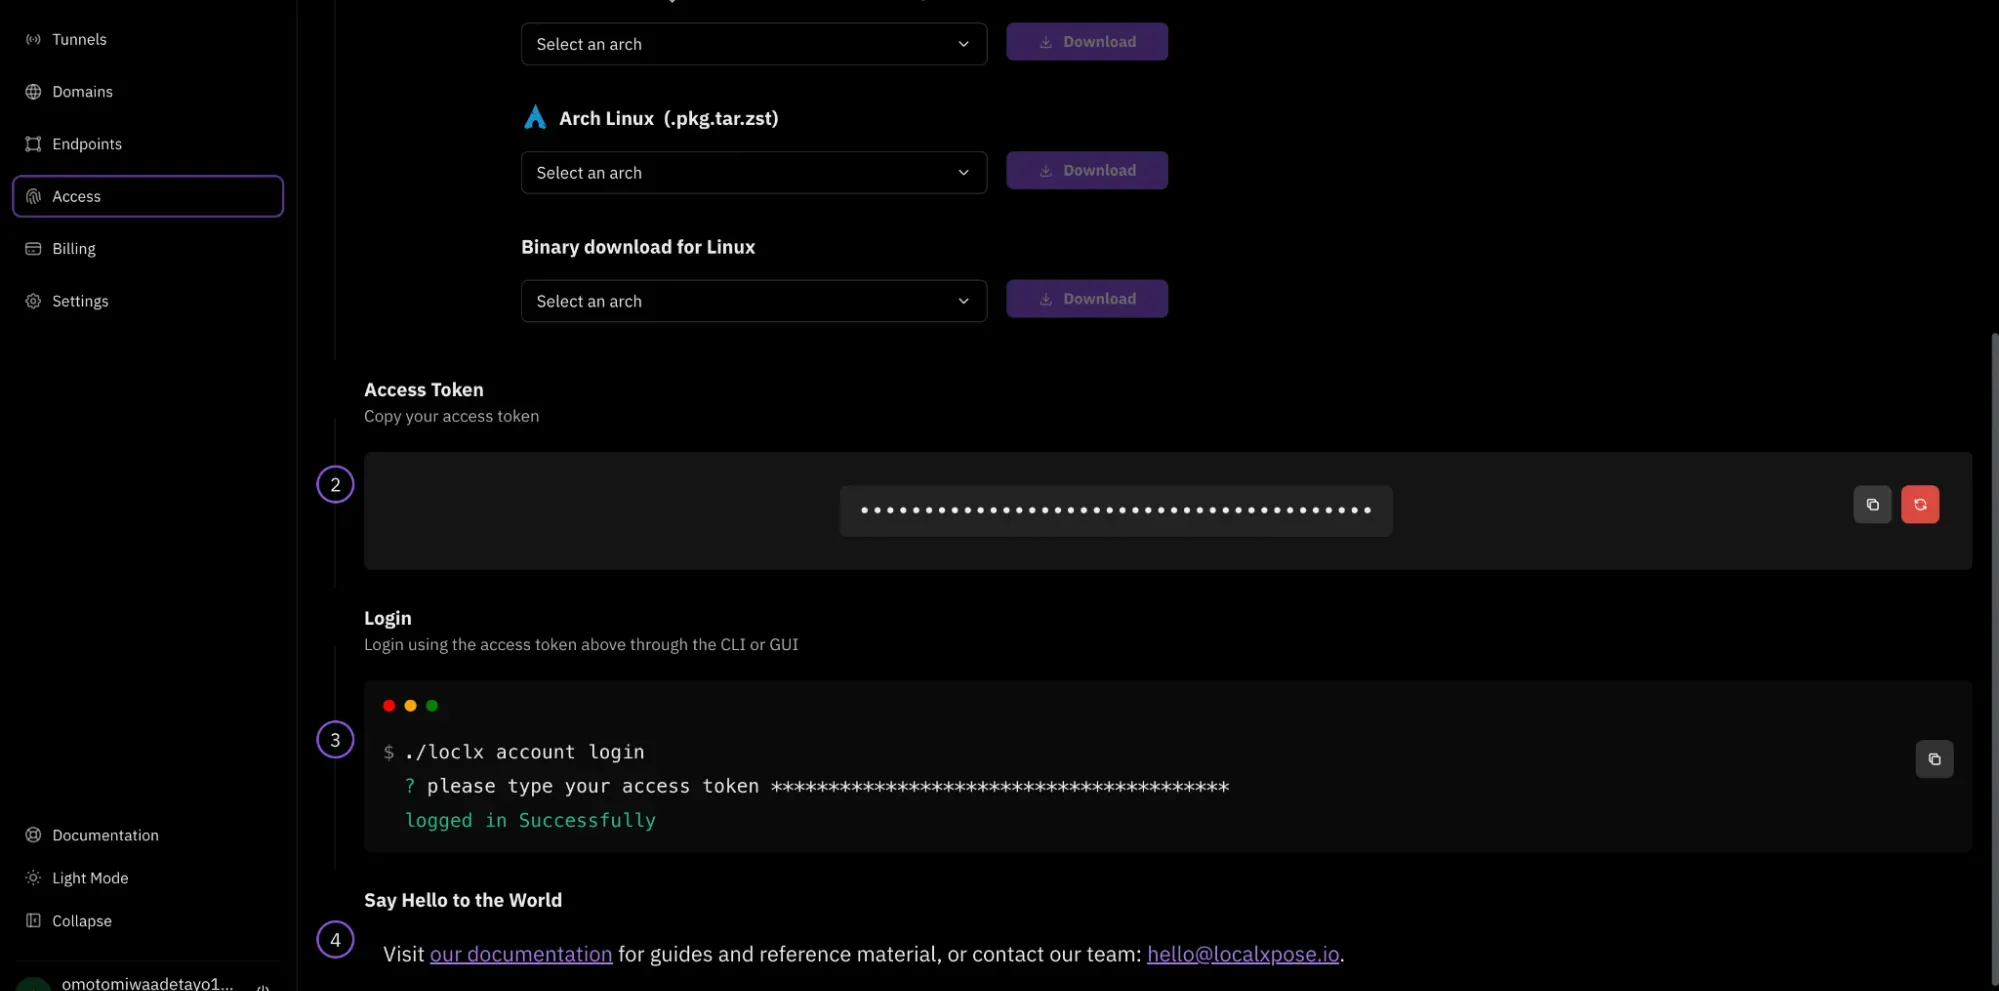
Authenticate the CLI:
loclx account loginFollow the prompts to paste your token. Confirm authentication worked:
loclx account statusStep 4: Start the HTTP Tunnel
With n8n running on port 5678, create a tunnel:
loclx tunnel http --to 5678LocalXpose will display a public URL like:
https://your-random-subdomain.loclx.ioLeave this command running. The tunnel stays active as long as this process runs.
Copy the URL and open it in your browser. You’ll see a LocalXpose confirmation page on first visit. Note that this confirmation page is only shown when using a free account, which you can easily upgrade in your dashboard.
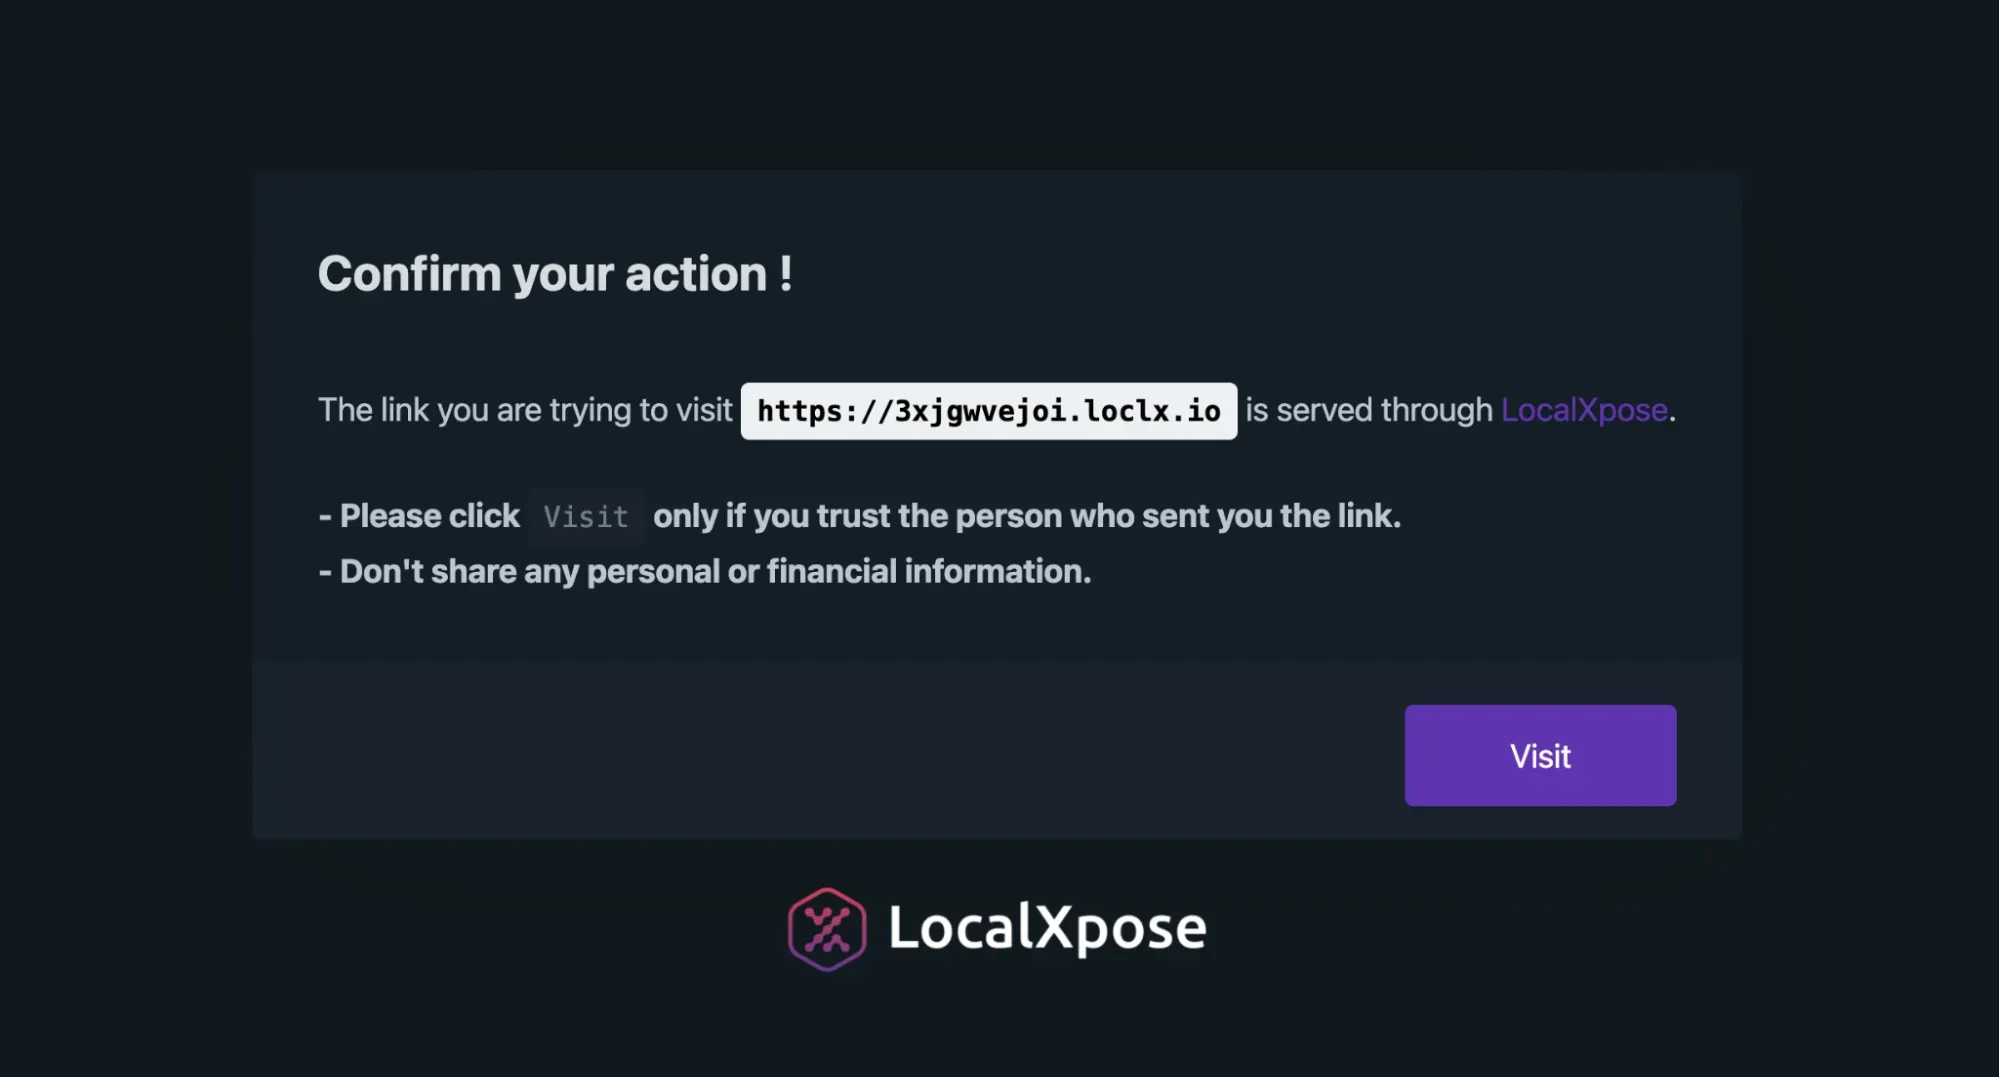
Click Visit to proceed. You should now see your n8n editor through the public URL.
Step 5: Configure n8n Webhook URL
n8n needs to know about the public URL so webhook nodes generate correct endpoints.
First, copy your LocalXpose URL from the terminal:
https://your-random-subdomain.loclx.ioStop your n8n instance, then restart it with the WEBHOOK_URL environment variable:
If using Docker:
docker run -it --rm \
  --name n8n \
  -p 5678:5678 \
  -e WEBHOOK_URL=https://your-random-subdomain.loclx.io/ \
  -v n8n_data:/home/node/.n8n \
  docker.n8n.io/n8nio/n8n
If using docker-compose.yml:
services:
  n8n:
    image: docker.n8n.io/n8nio/n8n
    ports:
      - '5678:5678'
    environment:
      - WEBHOOK_URL=https://your-random-subdomain.loclx.io/
    volumes:
      - n8n_data:/home/node/.n8n
Then run:
docker compose up -dIf running n8n directly with Node.js:
export WEBHOOK_URL=https://your-random-subdomain.loclx.io/
n8n start
After n8n restarts, webhook nodes will now show URLs starting with your LocalXpose domain instead of localhost.
This webhook URL configuration is what enables remote access to n8n. Once configured, the webhook nodes in your workflows will automatically generate public URLs that external services can reach, solving the core problem of exposing your local n8n instance to the internet.
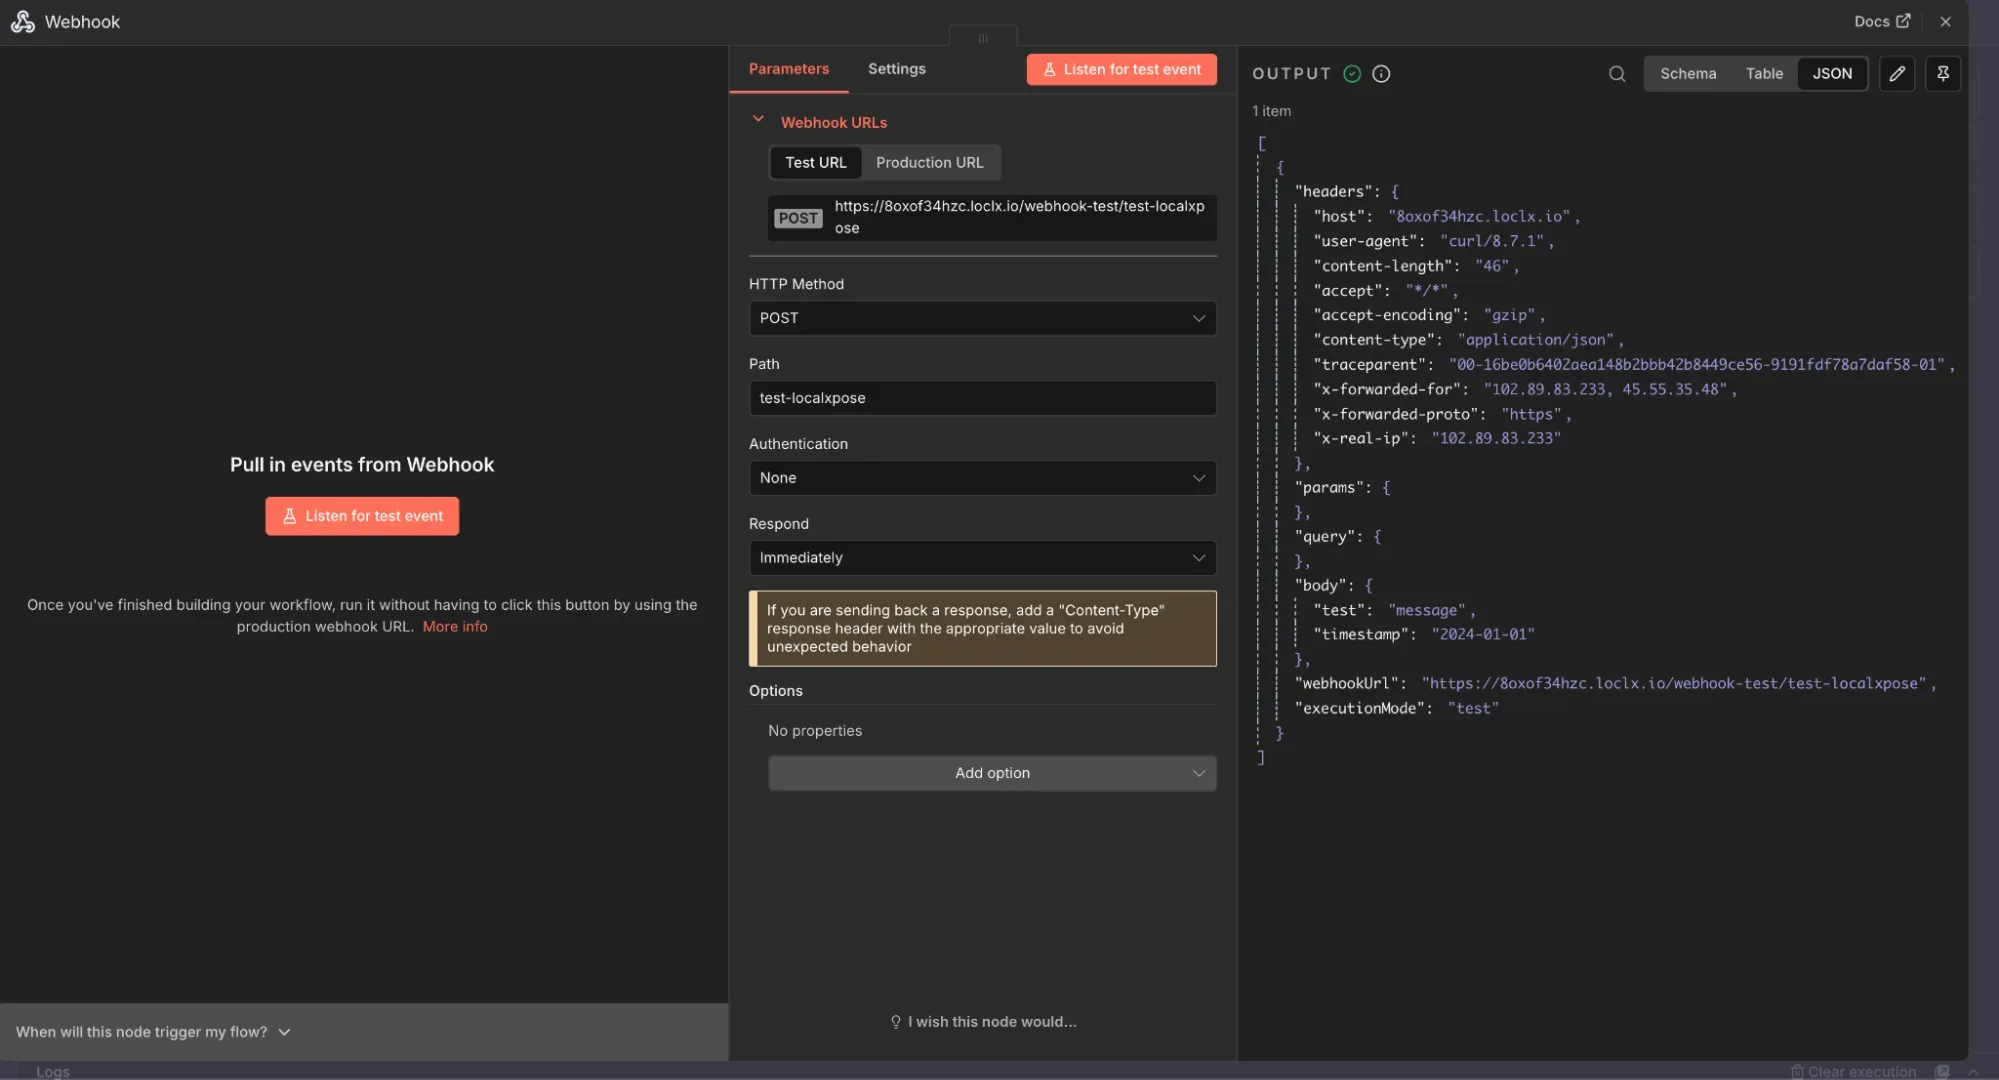
Step 6: Test the Webhook
Create a simple test workflow in n8n:
- Add a Webhook node
- Configure it:
- HTTP Method:
POST - Path:
/test-localxpose
- HTTP Method:
- Save and activate the workflow
n8n displays the full webhook URL:
https://your-random-subdomain.loclx.io/webhook/test-localxpose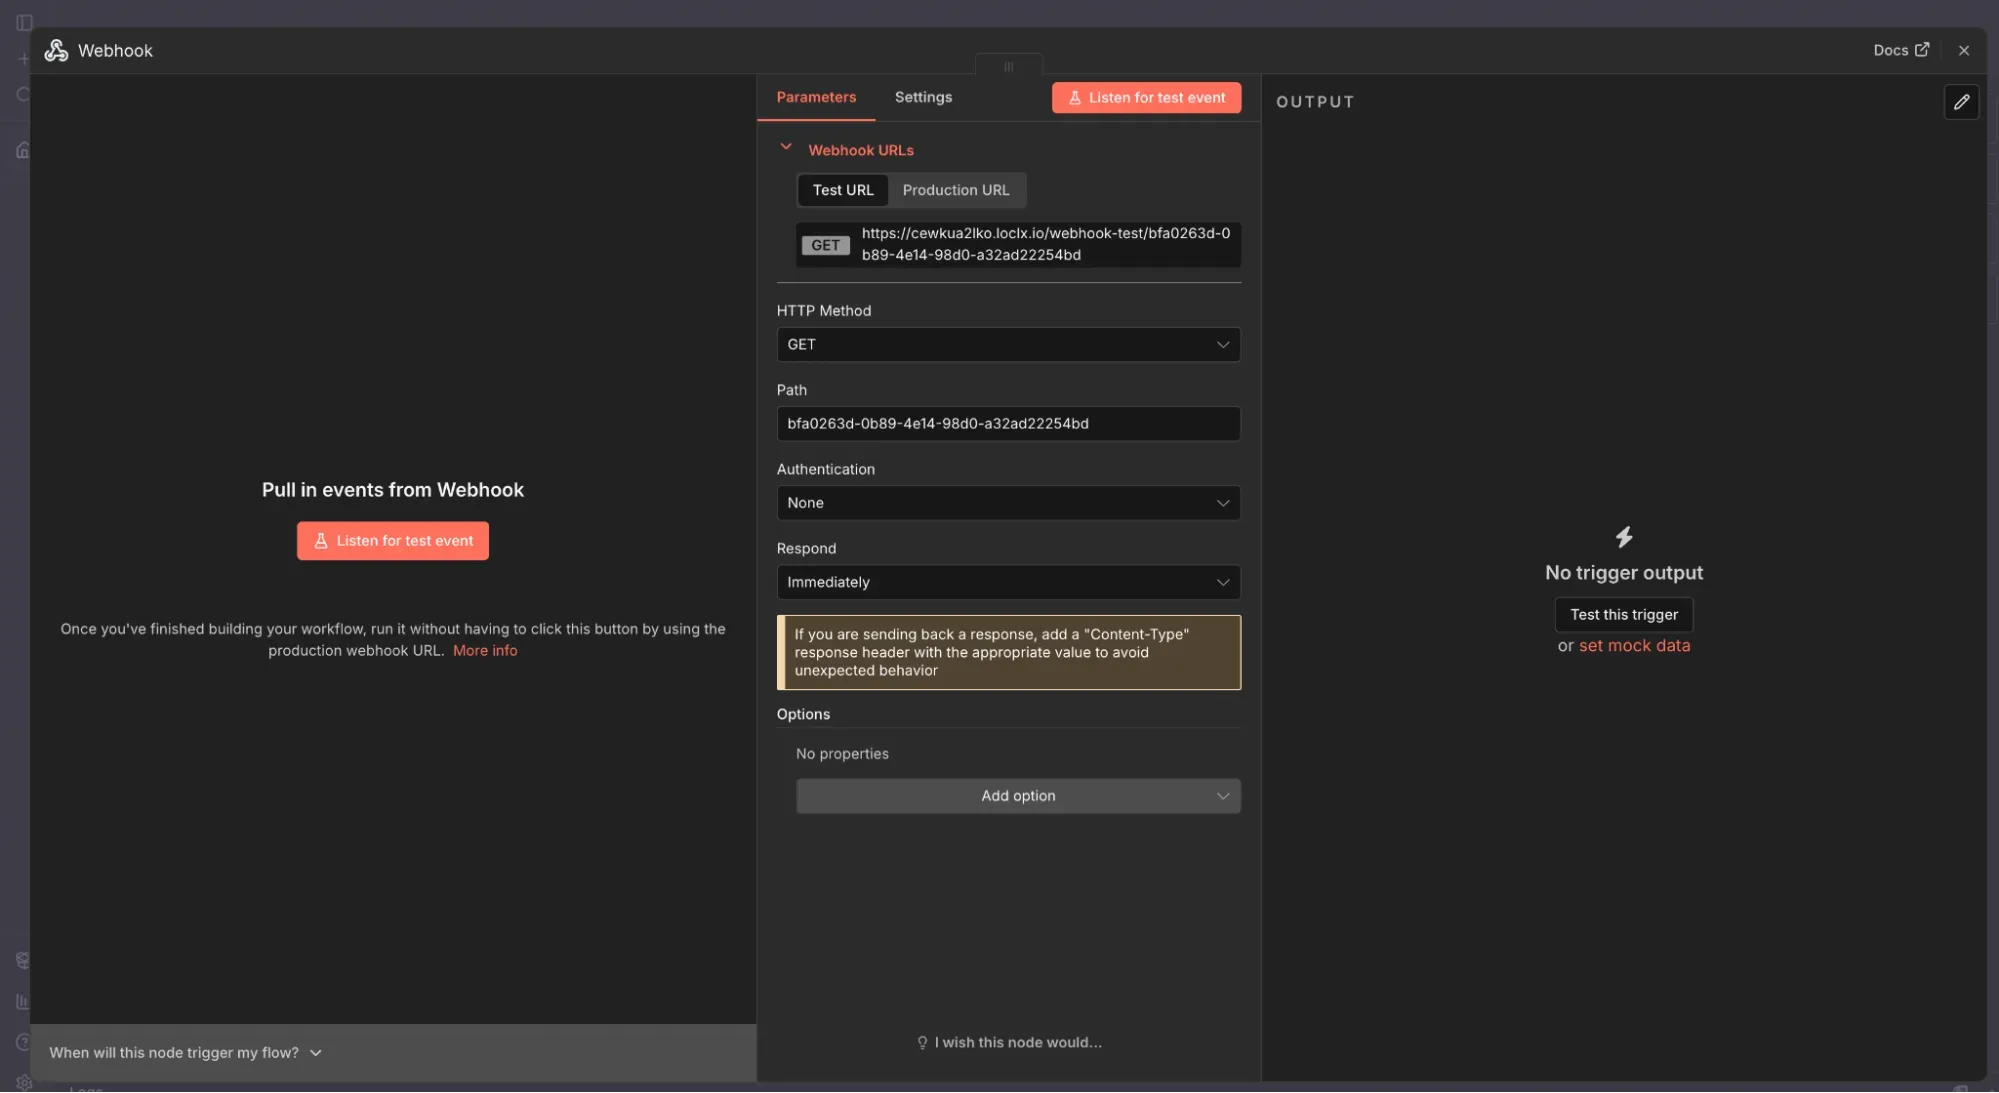
Test it from your terminal:
curl -X POST "https://your-random-subdomain.loclx.io/webhook/test-localxpose" \
  -H "Content-Type: application/json" \
  -d '{"test": "message", "timestamp": "2024-01-01"}'
Check the n8n executions panel. You should see a new execution with your test data.
Optional: Custom Subdomain and Region
For more control, specify a custom subdomain and region:
loclx tunnel http \
  --to 5678 \
  --region eu \
  --subdomain n8ntunneldemo
Using a stable subdomain makes it easier to update webhooks in external services, since the URL won’t change each time you restart the tunnel.
Keeping the CLI Tunnel Running
The tunnel only works while the loclx tunnel command is running. For short testing sessions, keep
it running in a dedicated terminal tab.
For longer sessions, use a terminal multiplexer like tmux or screen to keep the process running
in the background.
Method 2: Expose n8n to the Internet Using LocalXpose Docker
If you prefer Docker or already run n8n in containers, this method runs LocalXpose as a Docker container instead of installing the CLI.
Step 1: Confirm n8n is Accessible
Verify n8n is running and reachable at:
http://localhost:5678It doesn’t matter if n8n itself runs directly on your machine or inside a Docker container, as long as the port is accessible.
Step 2: Pull LocalXpose Docker Image
docker pull localxpose/localxposeVerify the image:
docker images | grep localxposeStep 3: Run LocalXpose Container
Start a LocalXpose container that tunnels to your n8n port. You’ll need your LocalXpose access token.
On macOS or Windows:
docker run -it --rm \
  -e LX_ACCESS_TOKEN=YOUR_LOCALXPOSE_TOKEN \
  localxpose/localxpose \
  tunnel http --to host.docker.internal:5678
The host.docker.internal hostname lets the container reach your host machine’s localhost.
On Linux:
Use host networking mode:
docker run -it --rm \
  --network host \
  -e LX_ACCESS_TOKEN=YOUR_LOCALXPOSE_TOKEN \
  localxpose/localxpose \
  tunnel http --to 127.0.0.1:5678
The container logs will display a public URL:
https://your-docker-n8n.loclx.ioLeave this container running. Open the URL in your browser to verify it reaches your n8n instance.
Step 4: Configure n8n Webhook URL
Copy the LocalXpose URL from the Docker logs and set it as n8n’s WEBHOOK_URL:
Using docker run:
docker run -it --rm \
  --name n8n \
  -p 5678:5678 \
  -e WEBHOOK_URL=https://your-docker-n8n.loclx.io/ \
  -v n8n_data:/home/node/.n8n \
  docker.n8n.io/n8nio/n8n
Using docker-compose.yml:
services:
  n8n:
    image: docker.n8n.io/n8nio/n8n
    ports:
      - '5678:5678'
    environment:
      - WEBHOOK_URL=https://your-docker-n8n.loclx.io/
    volumes:
      - n8n_data:/home/node/.n8n
After restarting n8n, webhook nodes will display URLs starting with your Docker tunnel domain.
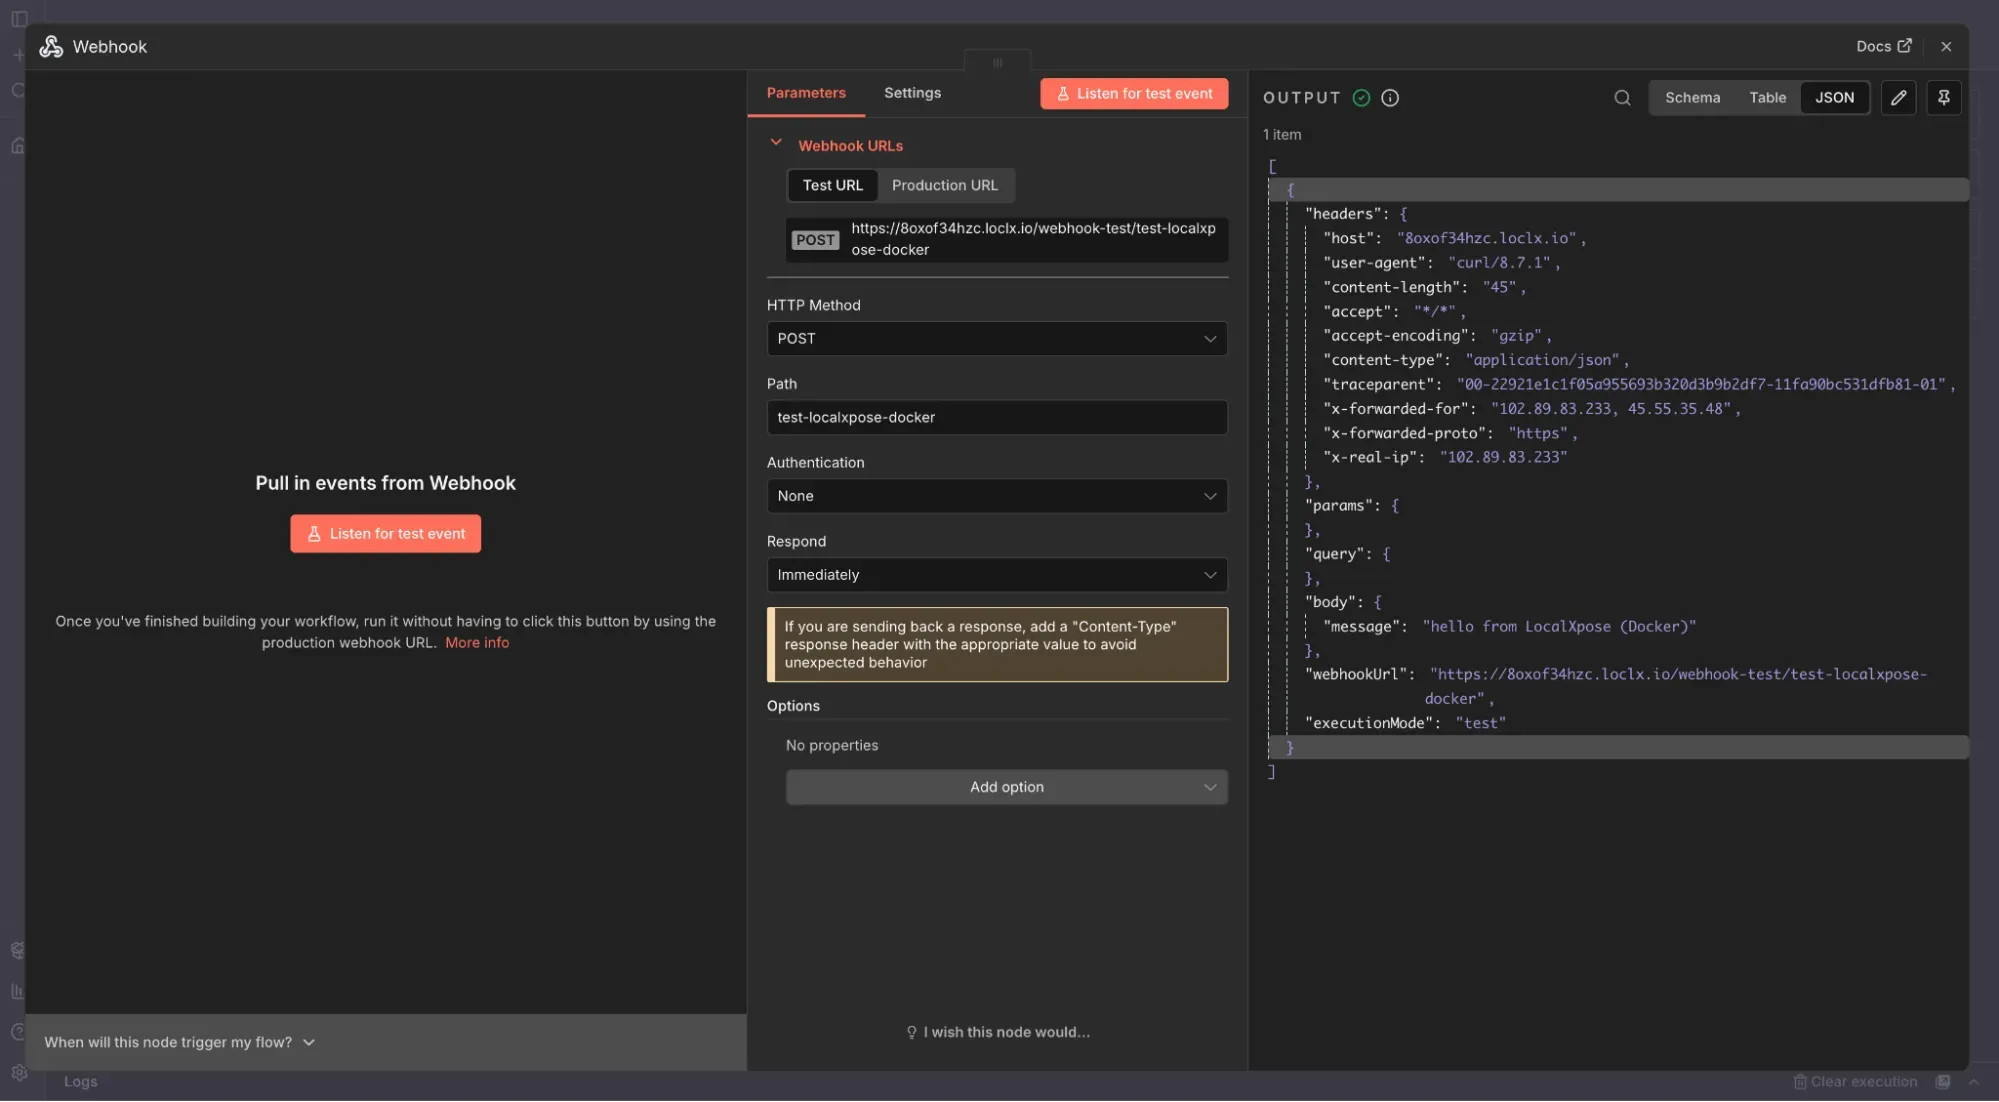
Step 5: Test the Docker Tunnel
Create a test workflow with a Webhook node:
- HTTP Method:
POST - Path:
/test-localxpose-docker
Save and activate it. n8n shows:
https://your-docker-n8n.loclx.io/webhook/test-localxpose-dockerTest it:
curl -X POST "https://your-docker-n8n.loclx.io/webhook/test-localxpose-docker" \
  -H "Content-Type: application/json" \
  -d '{"message": "hello from LocalXpose Docker"}'
Check the n8n executions panel to confirm the webhook was received.
Optional: Docker Compose Setup
Run both n8n and LocalXpose together:
services:
  n8n:
    image: docker.n8n.io/n8nio/n8n
    ports:
      - '5678:5678'
    environment:
      - WEBHOOK_URL=https://your-docker-n8n.loclx.io/
    volumes:
      - n8n_data:/home/node/.n8n

  localxpose:
    image: localxpose/localxpose
    environment:
      - LX_ACCESS_TOKEN=YOUR_LOCALXPOSE_TOKEN
    command: tunnel http --to host.docker.internal:5678
    restart: unless-stopped

volumes:
  n8n_data:
Start both services:
docker compose up -dCLI vs Docker: Which Method to Choose
Use the CLI method if:
- You want the quickest setup
- You’re testing on a single machine
- You don’t use Docker for other tools
Use the Docker method if:
- You already run n8n and other services in Docker
- You want a reproducible setup with docker-compose
- You prefer keeping tools isolated in containers
Both methods achieve the same result: a public HTTPS URL that forwards traffic to your local n8n instance on port 5678.
Troubleshooting
Webhooks suddenly stop working:
- Check if the LocalXpose tunnel is still running (
loclx tunnelcommand or Docker container) - Verify n8n is still accessible at
http://localhost:5678 - Confirm
WEBHOOK_URLmatches your current LocalXpose URL
Can’t reach n8n through LocalXpose URL:
- Test
http://localhost:5678directly in your browser first - Check firewall settings aren’t blocking the tunnel
- Verify you’re using the correct port number (5678 is n8n’s default)
Webhook URLs still show localhost:
- Restart n8n after setting the
WEBHOOK_URLenvironment variable - Check that
WEBHOOK_URLincludes the trailing slash - Verify the environment variable is actually set:
docker exec n8n env | grep WEBHOOK
Conclusion
You now have a public HTTPS URL that exposes your local n8n instance to the internet. External services can trigger your workflows through webhooks, letting you test integrations with Stripe, GitHub, Slack, and other platforms without deploying n8n to a production environment.
Ready to get started? Sign up for a free LocalXpose account and expose your n8n instance in under 5 minutes.
Related Resources:
