1. Install PostgreSQL
If you are running Linux, you can install it using your package manager from your Distribution repository. Check the official installation docs (opens in a new tab) for more details if you are using Windows or macOS.
$ sudo apt install postgresql-12
# for debian based distros.
Once installed,
$ psql --version
psql (PostgreSQL) 12.2 (Debian 12.2-4)
2. Reserve an endpoint
We can reserve an endpoint for this specific use case.
$ loclx endpoint reserve --region ap --port 5432
✓ Reserving an Endpoint...
endpoint is reserved in ap -> ap-2.loclx.io:5432
3. Add an alias domain to your endpoint
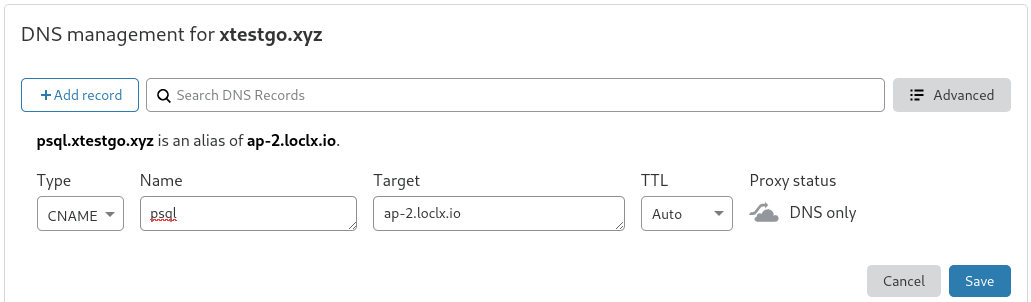
If you want to use your own domain name, you will need to add a CNAME DNS record for your domain to the endpoint reserved for your PostgreSQL Server, take this screenshot for reference.
Here we have created a sub-domain psql.xtestgo.xyz as an alias to ap-2.loclx.io.
4. Expose your PostgreSQL port
PostgreSQL runs default in port 5432, lets run LocalXpose to expose that port.
$ loclx tunnel tcp --reserved-endpoint ap-2.loclx.io:5432 --to :54
✓ Creating TCP tunnel...
Tunneling TCP: ap-2.loclx.io:5432 --> :5432
If you want LocalXpose to start exposing this port on boot-up, you can run loclx as a daemon by writing a systemd unit file similar to here.
5. Connect to your PostgreSQL Server
Next, you can connect to your PostgreSQL database from anywhere you want.
psql -U test -h psql.xtestgo.xyz test_dbPassword for user test:
psql (12.2 (Debian 12.2-4))
Type "help" for help.
test_db=#Here we use the host '-h' option with our domain as argument, but if you
don't have a domain you can use the endpoint provided by LocalXpose. Also note
the username & database_name astest& test_db respectively.
6. Fiddle around with your Database
test_db-# \dt
           List of relations
 Schema |    Name    | Type  |  Owner
--------+------------+-------+----------
 public | company    | table | postgres
 public | department | table | postgres
(2 rows)test_db=# select * from company;
id | name | age | address | salary
----+------+-----+---------+--------
1 | Tom | 23 | SKR | 2300
2 | Rick | 18 | BKT | 4200
3 | Bob | 32 | NY | 16007. Configure SSL with Let's Encrypt (Recommended)
You might want to configure PostgreSQL to use SSL. Follow the following guide to setup ssl with postgresql, Here we use let's encrypt (opens in a new tab) free certificates, but if you have your own, you may use it.
i. Get SSL certificates from Let's Encrypt
LocalXpose (opens in a new tab) has built-in Let's Encrypt (opens in a new tab), you can use it to get SSL certs in few seconds.
sudo loclx letsencrypt --domain psql.xtestgo.xyzPlease make sure of the following rules:
1. There is no a running tunnel using the domain which you want to issue a certificate for
2. Port 54538 is free
✓ Creating certificate...
TLS Certificate and private key are created successfully, You will find them in /root/localxposeOnce done, you will find your certificates, in the path mentioned.
$ ls $HOME/localxpose
psql.xtestgo.xyz-cert.pem psql.xtestgo.xyz-key.pemYou might need to verify permissions of those certificate files. File must have permissions u=rw (0600) or less if owned by the database user, or permissions u=rw,g=r (0640) or less if owned by root.
ii. Update postgresql.conf
Next, go ahead and update /etc/postgresql/12/main/postgresql.conf** **with few of the newer parameters.
Some operating system may have a different postgresql.confpath, You can find it with the following command.
$ sudo -u postgres psql -U postgres -c "SHOW config_file"
               config_file
-----------------------------------------
 /etc/postgresql/12/main/postgresql.conf
(1 row)
Find the SSL section in the postgresql.conf file and change it like so.
$ sudo nano /etc/postgresql/12/main/postgresql.conf

# - SSL -
ssl = on
ssl_cert_file = '/root/localxpose/psql.xtestgo.xyz-cert.pem '
ssl_key_file = '/root/localxpose/localxpose/psql.xtestgo.xyz-key.pem'
ssl_prefer_server_ciphers = on
Save the config file once done.
iii. Update pg_hba.conf
pg_hba.conf is in the same path as postgresql.conf file, you will need to allow external connections by adding the following lines.
$sudo nano /etc/postgresql/12/main/pg_hba.conf

# TYPE  DATABASE        USER            ADDRESS                 METHOD
hostssl    all             all           0.0.0.0/0                 md5
Next save the file and restart PostgreSQL Server.
$sudo systemctl restart postgresqliv. Connect to your Database
Similar to one mentioned above you can now connect to your postgresql database, and your conection should be encrypted with SSL.
$psql -U test -h psql.xtestgo.xyz test_db
Password for user test:
psql (12.2 (Debian 12.2-4))
SSL connection (protocol: TLSv1.3, cipher: TLS_AES_256_GCM_SHA384, bits: 256, compression: off)
Type "help" for help.

test_db=#
If you don't see a message regarding SSL information, you might want to check
PostgreSQL log file located on/var/log/postgresql/postgresql-12-main.log.
You can see the current connections by querying pg_catalog.pg_stat_ssl.
SELECT * from pg_catalog.pg_stat_ssl;

 pid  | ssl | version |         cipher         | bits | compression | client_dn | client_serial | issuer_dn
------+-----+---------+------------------------+------+-------------+-----------+---------------+-----------
 4496 | f   |         |                        |      |             |           |               |
 4498 | f   |         |                        |      |             |           |               |
 4527 | t   | TLSv1.3 | TLS_AES_256_GCM_SHA384 |  256 | f           |           |               |
 4494 | f   |         |                        |      |             |           |               |
 4493 | f   |         |                        |      |             |           |               |
 4495 | f   |         |                        |      |             |           |               |
(6 rows)
You can now proceed to use your Postgresql database. Similarly you can connect to your database using the same endpoint/domain with other tools like Dbeaver (opens in a new tab) or pgAdmin. (opens in a new tab)